Showing posts with label breakfast. Show all posts

Thursday, July 6, 2017

Dark Chocolate Cherry Granola


Dark chocolate cherry granola.

The name itself sounds like a decadent dessert.

And while you could definitely enjoy a bowl of it for dessert (ooh, or on top of a scoop of ice cream), we like to eat ours for breakfast. I mean, anytime you can have chocolate for breakfast it's good, right?


The sweetness of the cherries is balanced by the bitterness of the chocolate.Toss in some almonds for good measure, and you've got tasty, crunchy, granola goodness.

I cut my cherries in half to keep everything uniform in size and because the kids especially don't like the large pieces. This time I also used dark chocolate chips instead of chopping a bar, so I cut those in half, too. Of course, you could save yourself some time and work and just simply toss in the cherries and chocolate as is. But if you have picky, big-chunk-disliking kiddos, you might want to give your add-ins a chop. 

Either way, this granola is worth the work.


Dark Chocolate Cherry Granola
Ingredients:
5 cups old-fashioned oats
1/2 cup slivered almonds 
2/3 cup honey
1/3 cup coconut oil 
1/2 cup peanut butter
2 teaspoons cinnamon
1 tablespoon vanilla
1 cup dried cherries
3/4 cup chopped dark chocolate pieces

Directions:
1. Place oats and almonds in a large bowl.
2. In a glass measuring cup or small bowl, combine the honey, coconut oil, and peanut butter. Microwave for one minute; whisk. Microwave an additional 30 seconds, or as needed, to melt everything and allow it to combine smoothly. (Can also be melted on the stove in a small saucepan.)
3. Stir in cinnamon and vanilla. Pour over oats and almonds and mix to coat. (I use a spatula.)
4. Spread granola in an even layer on a rimmed baking sheet. Bake at 275°for 20 minutes. Stir and bake for an additional 10 minutes. Let cool completely before mixing in dried cherries and chocolate. Store in an air-right container. 
 
Pin It

Thursday, June 29, 2017

Peanut Butter Cup Granola


We have been obsessed with homemade granola ever since making this version in the crock pot years ago. I've since switched my method to cooking in the oven, and it is just as delicious.

With a family of 7, you can imagine that granola doesn't last long (actually, nothing lasts long with a family of 7, ha), so I like to make a lot at one time. I usually make 3 types. While one is in the oven, I prepare another. This way, I'm reusing the dishes without having to wash everything, and since most of the ingredients are the same, I have those out already too. It saves me time and streamlines the process. In less than 2 hours, we can have a ton of granola and a clean kitchen. The most difficult thing is trying to decide which kind to make!


It's no secret that we love the combination of peanut butter and chocolate. I mean, homemade Butterfingers made with a crazy ingredient, a decadent peanut butter brownie torte, rich and creamy peanut butter pie, these peanut butter bars which is one of our absolute favorite desserts, homemade Girl Scout peanut butter patties, and a cool and creamy peanut butter cup ice cream cake, anyone? All delicious, yes, but did you notice a theme? They're all desserts. And while I could totally enjoy a peanut butter bar any time of the day, it's probably not the best idea. This granola though is completely acceptable as a breakfast food! Sure, it has a bit of chocolate and chips, but it's still better than those sugary cereals, and it keeps you full longer. Sounds like a good compromise to me. Besides, the kids always think I'm making no bake cookies when this granola is cooking, because it smells exactly the same. So, it's still kinda like eating cookies for breakfast, ha.

I have been working to perfect this recipe for a while. Each time I'd make it, I'd tweak it to make it just a little bit better until we got to this. It is bursting with peanut butter flavor with a hint of chocolate. Of course, with any granola recipe, it's easy to change it to meet your tastes. Leave out the cocoa powder for a pure peanut butter version or don't add the chips for a more subtle peanut butter flavor. I use Reese's brand of baking chips to give it more of a true peanut butter cup flavor, but any brand will work.
 
Of all the granolas we make, this is the kids' favorite. I hope you like it as much as we do.


Peanut Butter Cup Granola
Ingredients:
5 cups old-fashioned oats
1 cup peanut butter
3/4 cup honey
1/4 cocoa powder
1 teaspoon vanilla extract
1 cup peanut butter chips

Directions:
1. Place oats in a large bowl.
2. In a glass measuring cup or small bowl, combine the honey and peanut butter. Microwave for one minute; whisk. Microwave an additional 30 seconds, or as needed, to melt everything and allow it to combine smoothly. (Can also be melted on the stove in a small saucepan.)
3. Stir in cocoa powder and vanilla. Pour over oats and mix to coat. (I use a spatula.)
4. Spread granola in an even layer on a rimmed baking sheet. Bake at 275°for 20 minutes. Stir and bake for an additional 10 minutes. Let cool completely before mixing in peanut butter chips. Store in an air-right container.

Pin It

Thursday, January 14, 2016

Biscuits & Gravy


Biscuits & gravy is a family favorite. All 5 kids get excited as soon as they smell the sausage cooking. I'm reminded of a couple years ago when I said that I was making it for breakfast. Jake responded, "Oh, I love biscuits and gravy!!! Heaven just came down to earth.'" 

I always serve sausage gravy over my buttermilk biscuits. Thick, fluffy biscuits and rich, creamy gravy--it's a perfect union. Not only do they taste great together, they cook at the same rate too. I can have the meal on the table in about 20 minutes. I start by preparing my buttermilk (1 tablespoon white vinegar and enough milk to fill 1 cup) for the biscuits and then start browning the sausage for the gravy. Just as the biscuit edges' are turning brown, the gravy is nice and thick. It's like they were made for each other.

We love it for a big family breakfast on Saturday or for dinner on a weeknight. Even reheated leftovers are good! Biscuits & gravy is the perfect dish for any time.


Sausage Gravy
Ingredients:
1 lb. sausage
1/4 cup flour
2 1/2 cups milk
salt & pepper to taste

Directions:
Brown sausage over medium-high heat until cooked through. Mix in flour and cook for 1 minute. Slowly pour in milk, stirring to scrape bits of browned sausage off the bottom of the pan. Add salt and pepper to taste. Cook until mixtures comes to a full boil. Reduce heat to medium-low and cook until gravy thickens to desired consistency. Serve over biscuits

Pin It

Tuesday, November 11, 2014

Tasty Tuesday: Crock Pot Granola


My mom first made this granola recipe back in February and had me try it. It was so good that I got the recipe from her and made it a couple days later.

We've been making it ever since.


Leighton keeps a jar of it at work and eats it by the handful. The kids like it with milk. I mix mine with Greek yogurt.

It's great eaten as a snack or as a meal, because it's healthy and filling. Oh, and delicious.


And as a bonus? It's so much cheaper than buying it from the store. And did I mention that it's easy to make?

Honestly, if you like granola, you need to give this one a try!


Crock Pot Granola
Ingredients:
5 cups old-fashioned rolled oats
1/2 cup slivered almonds (I pulse mine in the food processor a bit, because we don't like large pieces.)
1 cup raw pumpkin seeds 
1/4 teaspoon salt
1/2 cup ground flax seed (optional)
2/3 cup honey
1/3 cup coconut oil 
1/2 cup peanut butter
2 teaspoons cinnamon
1 tablespoon vanilla
1 cup raisins or craisins

Directions:
1. Lightly grease the crock-pot with oil. Add the oats, almonds, pumpkin seeds, salt, and ground flax seed, if using.
2. In a large measuring cup or small glass bowl, combine the honey, coconut oil, peanut butter, cinnamon, and vanilla. Microwave for one minute, stir and microwave an additional 30 seconds, as needed, to melt everything and allow it to combine smoothly. (Can also be melted on the stove in a small saucepan.)
3. Pour the liquids over the oats in the crockpot and stir well to thoroughly coat. Place the lid on the crockpot, leaving it slightly vented. Cook on HIGH for about 2 hours, stirring every 30 minutes.
4. Stir in the dried fruit right at the end. Spread the granola across a large baking sheet and let it cool before transferring to an airtight container. It fills a half-gallon mason jar.

Recipe adapted from Barefeet in the Kitchen.
Pin It

Wednesday, July 24, 2013

Tasty Tuesday: Buttermilk Biscuits


Big, warm, soft buttermilk biscuits.

Eat them in the morning, slathered in gravy or eat them in the evening, alongside fried chicken.

They're pretty much perfect.


We used to buy the refrigerated biscuits in the blue can all the time. They were convenient, easy, and pretty good.

But then, years ago, I started making my own.

And I've never looked back.


Making homemade biscuits may not be as convenient as pulling a tube out of the fridge, unraveling the wrapper, whacking it on the counter, and placing the dough on a cookie sheet . . . but it's pretty close.

I toss the ingredients in my food processor, mix it up, plop it onto a cookie sheet, flatten it a little with my hands, and cut out the biscuits. Start to finish, it takes me about 5 minutes to whip up the very best biscuits. Ever.

The hardest part about it???


Trying to keep my little ones from gobbling them all up!


Notes:
  • I never buy buttermilk. I measure about 1 cup of whole milk and mix in 1 tablespoon of white vinegar (or lemon juice) and leave it. After I add the other ingredients to the processor, the milk has curdled nicely, and I stir it and add it, as well.
  • I love my Silpat mats and use them whenever I can. I plop the dough onto a mat, cut out the biscuits, and bake them right on the mat. There is no need to use extra flour. There is no mess. The food bakes evenly.
  • Most recipes using buttermilk will include baking soda because of the acidity. I have added the baking soda to this recipe and have made different recipes altogether. The biscuits do not rise as well and are not as fluffy, in my opinion. 
  • These turn out well using whole milk in place of the buttermilk.
  • I almost always use butter-flavored shortening. It produces a rich, flavorful biscuit.
  • I have used half all-purpose flour and half whole wheat flour. They turn out well, but as with any whole wheat recipe, the biscuits are a little denser and not as fluffy. I highly recommend using all all-purpose.
  • If the dough is too wet, add 1 teaspoon flour; if it's too dry, add 1 teaspoon water or milk. I like it a little on the sticky side. Too much flour will make the biscuits tough. If the dough sticks to my metal biscuits cutter, I shake it to get it out. I always have some residual dough on my hands when I am finished.   
  • As with any dough, you do not want to over-work it. I run my food processor long enough only to combine the ingredients. After I dump it out, I pat it a few times to get it to the thickness I desire. 
  • You can cut the biscuits any size. I use my 2½" or 3" (shown here) cutters. You'll know when they're done when the edges start to brown. I rarely use the timer when I make breads. I tend to just bake until my eyes tell me it's done.
  • If you rub a stick of butter on the tops when they come out of the oven, they will taste like KFC's biscuits, but better.
  • The biscuits start to separate across the middle. It makes it easy to pull the halves apart and add butter, jam, or gravy. Or, if you're like my hubby, you can eat them plain. (But why would you want to do that?)


Buttermilk Biscuits
Ingredients:
2 c  flour
1 Tbsp baking powder
1 tsp salt
1 Tbsp sugar
1/3 c shortening
1 c buttermilk

Directions:
1. Place all ingredients in food processor, fitted with dough blade, and mix until dough pulls away from the sides.
2. Turn out onto a baking mat, or floured surface, and pat dough out to about 1 inch thick. Cut biscuits with a large cutter or juice glass dipped in flour. Repeat until all dough is used.
3. Bake on the baking mat or an ungreased cookie sheet at 400°F for 13 to 15 minutes or until edges begin to brown.
Pin It

Wednesday, March 6, 2013

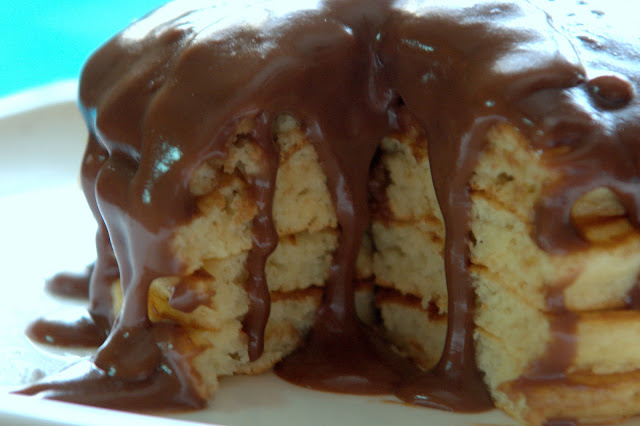
Tasty Tuesday: Chocolate Gravy


Oh, my. I started this post when we celebrated National Pancake Day.

February 5.

We've cut back on celebrating the national days lately. It wasn't intentional. It's just that we were incredibly busy the entire month of December and then dealt with Tyler's sickness the month of January. 

And now February is completely gone too??? Oh, my.

There's no way we could forget Pancake Day, even though we postponed the sharing of it. You see, there really is a good reason why I started writing this post up a month ago, yet never actually published it. Our camera - my camera - died the day of Jake's birthday party. (There's another post I haven't written yet. Sheesh.) We haven't taken it in to be fixed yet. (Remember, busy the month of December, Tyler's sickness in January, and what happened to February?) Anyway, we've been borrowing one of my mom's extra cameras. Hers is a Sony a700. Ours is a Sony a390. They're similar, so I should be able to use it, right? Right. But I can't. Now, I'm not the best picture-taker-er in the first place, but I can usually get a pretty good shot. I'm having a hard time changing the settings on this camera and not even getting a decent picture when it's set on auto. I took pictures of our pancakes that day, but was not at all pleased with them. Is my embarrassment of awful pictures and hurting my pride more important than sharing a super yummy recipe??? I think not.

But, I digress.
  

Last year, we made fruit-flavored syrup to celebrate National Pancake Day. It was incredibly easy to make and was so yummy the kids asked to eat it for breakfast, lunch, and dinner! All the ingredients are things that I always keep stocked in my pantry. We've made it multiple times since then, and they have loved every flavor we tried.

This year though, we made my favorite pancake topping: chocolate gravy.

Chocolate gravy.

Oh, it's heavenly. I've said before that I don't care much for pancakes. But top them with chocolate gravy, and I just can't resist!


Don't think it's just for pancakes though. Eat it on waffles. And biscuits. And crepes. And fingers. (Just don't bite!) 

Although, you may want to skip the fingers altogether and just reach for a spoon.


 We got this cute little gravy dish a few years ago. The kids love whenever we use it.


See why???

It really is kinda gross thinking about the rooster vomiting all over our food. But the comedy factor wins every time. 

And the giggles from the kids are priceless.


So, whether or not you have poor picture quality or a thousand excuses or a vomiting-rooster, make some of this delicious gravy soon.

You won't be disappointed.


Chocolate Gravy
Ingredients:
1/2 cup butter
4 tablespoons unsweetened cocoa powder
1/4 cup all-purpose flour
3/4 cup white sugar
2 cups milk

Directions:
Melt butter in a pot over medium heat. Add cocoa and flour, stirring until a thick paste is formed. Stir in sugar and milk. Cook, stirring constantly, until thickened.
Recipe adapted from allrecipes.
Pin It

Wednesday, May 2, 2012

Tasty Tuesday: Breakfast Burritos

¡Bienvenidos! Cinco De Mayo is quickly approaching. The fact that we're not Mexican, nor do we actually celebrate the holiday, isn't going to stop us from eating Mexican inspired foods! In fact, I even made chicken quesidillas for dinner.

Ok, so it was mostly because I had leftover chicken from the rotisserie we made the other day, but whatever. 

I like to make these burritos for Leighton for the mornings. He starts work at 6:00 am and doesn't always have  time to eat a sit-down breakfast before rushing out the door. He does, however, have time to grab something out of the freezer and pop it in the microwave. (I also make freezer breakfast sandwiches and waffles and like to keep muffins and quick breads on hand for variety, too.) The burritos are quick, easy, and filling. But more importantly, they're tasty!

I have fond memories of these burritos from when I was young.  I can remember watching my mom and aunt assemble these while we were visiting family in Texas. Later, my mom, dad, and I sat around the kitchen table with big bowls of fixings and made them again as a family. Now, I can build memories with my own little ones. What better way is there to bring a family together than food?


Cook the sausage until it's no longer pink.


Sauté the onions and peppers until soft.

I used a combo of green and chocolate peppers. And unfortunately, no, it does not taste like chocolate. Boo.


Scramble your eggs. Add salt and pepper as desired.


Dump everything into a HUGE bowl.


See that coffee cup? See the bowl? There's your size reference. Yes, I make a huge batch at a time. I don't want to be making these things up every week.


Give it all a good mixing.


Realize you forgot the cheese - oh, the horror! - add it and stir again.

Or you could just add it before mixing the first time. But where's the fun in that?


Place a healthy portion (healthy being a relative term) on a tortilla.


 Pull the ends in and roll from one side to the other.


Yum! You can either eat it now or -- Wait, what am I saying? Definitely eat one now.


The rest you can wrap and save for later.


I keep these in a freezer bag . . . in the freezer. Just make sure you zip it closed so they stay fresher longer.

Grab a burrito or two when you're rushed in the morning or anytime you want a hot, yummy meal. Pop it in the microwave for a minute or so, depending on how big your burritos are. This time, I used some taco-sized tortillas and mostly fajita-sized tortillas. (And yes, I'm still calling these "burritos.") I got 40 burritos altogether. Even my kids love these, so a batch doesn't last all that long.

As with any recipe, feel free to change the ingredients/amounts to your liking. Add some jalepeños for heat or potatoes for roughage or change up the flavors of cheese. Make the recipe your own. Also, the amounts can easily be decreased if you don't want enough to feed an army.

Do you eat breakfast burritos? What ingredients do you like in it?


Breakfast Burritos
Ingredients:
2 lbs rolled pork sausage
2 onions, chopped
2 green peppers, chopped
3 dozen eggs
3 cups salsa
5 cups shredded cheese (I used colby-jack.)
tortillas

Directions:
1.Cook the sausage in a skillet over medium-high heat until no longer pink. Pour off grease and dump sausage into huge bowl.
2. Cook the onions and peppers in the same skillet (already coated with sausage grease) over medium heat for 5 minutes or until tender. Dump into huge bowl.
3. Crack eggs in large bowl and whisk (with milk, if desired.) Pour into skillet and cook over medium heat, stirring occasionally, until desired doneness. Dump into huge bowl.
4. Add salsa and cheese to bowl and combine thoroughly.
5. Warm tortillas in microwave.
6. Place desired amount of mixture onto each tortilla and wrap, bringing in each side and rolling closed. Wrap in plastic wrap and place in a freezer-safe bag or container.
* To Heat: place a burrito in microwave for 1-1 1/2 minutes, depending on size of tortilla and amount of filling 
Pin It