Showing posts with label beads. Show all posts

Thursday, March 22, 2018

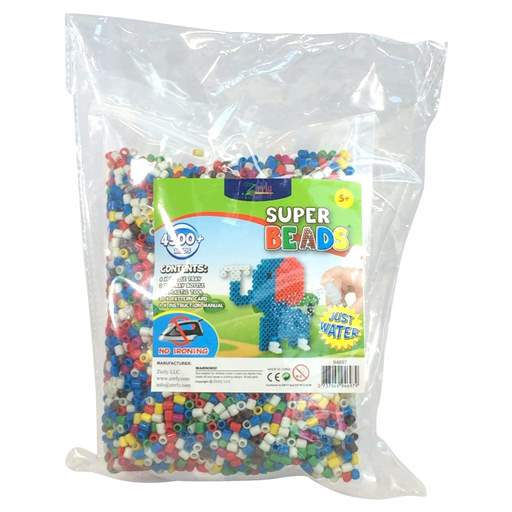
Super Beads


My daughter is the craft queen of our home. She has an ever-growing collection of supplies and interests, so when we were able to review a product from Zirrly, I knew she would be ecstatic. After all, the company's goal is to offer "unique and entertaining crafts with an education advantage." They offer so many fun craft kits, and Super Beads are no exception. We had such a hard time deciding which one we'd like.

After much debate, we chose the Mega Pack so there would be plenty of beads for all the kids.

My girl eagerly checked the mail every day until the bag of goodies arrived. All the kids gathered around the table as we looked through the supplies.

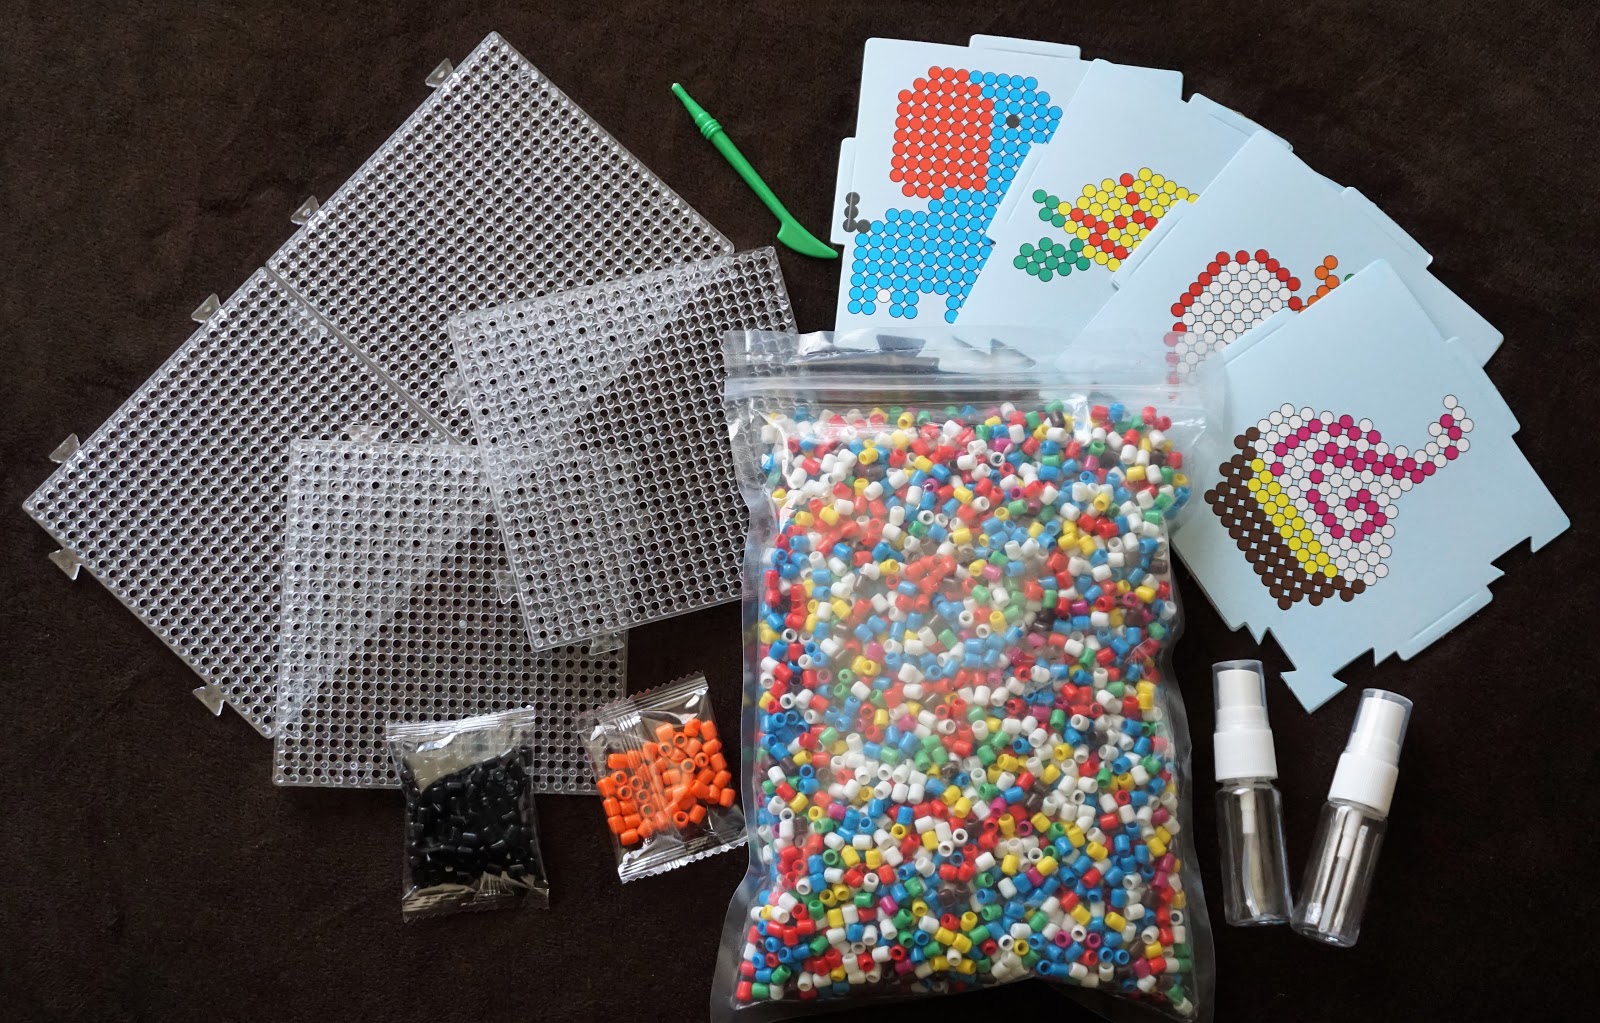
  • 4,500 beads
  • 5x4 assorted design templates
  • 2 spray bottles
  • 4 boards
  • 1 design tool
  • instructions 


The Super Beads are a form of fuse beads. Instead of having to melt with a hot iron though, you spritz the beads with water to stick together. The process is safe and perfect with little ones to use on their own. Another aspect that makes these beads a good option is that they fit snugly on the board. If someone shakes the table or if your little brother bumps your arm, your creation stays in place. No more frustration after losing all your hard work! In fact, you can even pick the board up, flip it upside down, and the beads stay right where you put them.

My kids have been making all sorts of creations with the beads. Magnets, hair barrettes, coasters,  little trinkets--if you can think it, you can make it. If you need help getting started with an idea though, the 4 designs cards (elephant, turtle, apple, cupcake) are helpful. They fit perfectly under the boards and make it simple to match the colors on the card or modify them to your liking (just remember to take the template out before spraying the water). The boards themselves snap together, making it possible to make much larger creations, too.


After the Super Beads dry, you can gently pull them off the board. This part can be a little tricky, but if you place the beads down the correct way with the lined part at the top, it makes it much easier to remove than when they're flipped every which way (ask me how I know, ha). The creations are a bit rubbery and flexible, so they don't break easily. If part of it does happen to separate, all you need is another squirt of water and it's fixed.

These boards have the pegs lined up next to each other, instead of each row being offset. It makes it difficult to make smaller creations look proportionate. The way to change that though is to make the bulk of the design, remove it from the board after drying, and then set the additional pieces in place and respray. You can see examples below as the very top of the strawberry and some of the ends of the snowflake.


My kids and I all agree that these Super Beads are so fun! They are easy enough for little ones to assemble and spray and stay together really well. The Mega Pack is a great choice for little artists, but there are many other kits, as well, like the jewelry set, the spinning tops, a set of 3D vehicles, and more. The kits would make a great addition to an Easter basket or just a fun surprise for anytime.

Thank you, Zirrly, for this fun craft!


You can connect with Zirrly on the following social media sites:
Facebook
Pinterest
Instagram
YouTube


You can read more reviews of the various kits of Super Beads on the Homeschool Review Crew blog.


Crew Disclaimer
Pin It

Wednesday, July 26, 2017

ACTÍVA


I have artsy kids, so anytime we can review art supplies is sure to be fun. Almost daily, someone is drawing, coloring, or folding origami creations, but it's not as often that we pull out the super messy supplies. The Rigid Wrap and CulluClay Quik-Sculpting Kit from ACTÍVA Products definitely falls into that get-your-hands-dirty category. Along with the kit, we received the ACTÍVA Products' Sculpture KIDS CRAFTS eBook that's filled with project ideas. 

ACTÍVA: Basic Materials for Creativity is a company that has been dedicated to quality arts and crafts supplies since 1959. They offer all sorts of materials from multiple types of air dry clay to plaster and molds for casting to colored sand and dried floral products and more. Along with their merchandise, their site is full of useful information like instructions, tips, techniques, and safety sheets. 


I knew the kids would be excited to start crafting as soon as the package arrived in the mail. I opened the box and immediately knew something was wrong. There was a white, powdery substance all over the kit and inside the shipping box. I carefully opened the kit to discover an even bigger mess. The CelluClay had a gaping hole in the clear, plastic packaging, causing the powder to cover the contents of the box. The two bags of Rigid Wrap, the instruction and project sheet pages, the remaining CelluClay, everything was a mess. I sent a quick email and received an equally quick reply. Within a few days, I received another kit, sans hole in the bag. Good customer service is always a plus for a company.

We really weren't sure what to expect with these products. I pulled up the free eBook and browsed through the ideas with the kids. My daughter (9 years) immediately was drawn to the bold beads made from Rigid Wrap plaster cloth strips. She loves making bead jewelry, so the ability to design her own beads was very appealing. The book lists skill level, time, materials, directions, and tips for each project. The directions for the beads was a little confusing, so it took some trial and error to figure it out. And though some of the beads were a little rough around the edges or bumpy and misshapen, that didn't stop her from exclaiming dozens of times how much fun she was having. She said, "I just can't stop making these!" Some more practice, I am sure her technique will improve and the bead-making addiction will be even stronger.


The boys, however, were not impressed with any of the suggestions in the book. (They were initially excited when I read "Deadly Dinosaur," but when they saw a friendly brontosaurus-type dino with a smile, they were disappointed.) They also did not prefer the projects that came in the kit either (which were mostly the same as the book and looks like a photocopy of a photocopy and blurry with one page so crooked that half of it was missing). Instead, they each decided on a project that we found while looking through the video demonstrations on the site. I found some old jars, gave the boys trays and bowls of water, and cut strips of Rigid Wrap. They got to work dipping the strips in water, removing the excess liquid, and wrapping the jar. My 7-year-old made his own (which he filled with roses and gave to his grandma, heart melt.) and my 11-year-old  helped his 5-year-old brother make one. (Make sure to check out the video at the end of the post he made of the process and see how easy it is to create your own!)

Both the beads and the vases dried quickly, but the kids didn't get a chance to paint them until the next day. That part was equally fun. I always like watching their creativity and differences as they design their masterpieces. The acrylic paints worked very well on the dried Rigid Wrap.


Next was trying to decide what to make with the CelluClay. This isn't a true clay, but rather an instant paper mache clay made from 100% pre-consumer recycled paper. Since no one wanted to recreate a project idea from the book, we brainstormed ideas and searched the web. It came as no surprise when we settled on a working volcano. (There is actually a volcano idea in the book, but it is a simple sculpture, and honestly, not what we were looking to make.) 

We enlisted the help of my husband to design the structure of the volcano. Then we used the CelluClay to coat it. This is where we ran into problems. There are no instructions whatsoever for the clay in the box. There's nothing on the bag. There's nothing in the eBook. There's not even anything in the description of the product on the website. Everything just says "mix the CelluClay in a Ziploc bag," but nothing is mentioned about amounts or process or anything. He did a search and found that it's recommended to use 32 oz of water to 1 lb of clay (which, I find a bit confusing, since the free eBook calls for 2.5 cups of clay for one of the projects. One is based on weight and the other volume. They're not interchangeable.) Just to be safe, we used 24 oz of water for our 1 lb, because you can always add water if needed, but you can't take away. Our oldest mixed the concoction, but instead of forming into a ball of clay, it stayed as a soupy pulp. It still worked to form the volcano, it was just sticky and messy and not clay-like. I enjoyed the process, but the kids did not like the feel of the goop. 


The volcano took a couple days to dry and the thicker parts finished off with the help of a fan. Next came a coat of spray paint, and our masterpiece was ready to erupt. The kids always enjoy watching the reaction of baking soda and vinegar. The CelluClay softened up again after multiple eruptions, and it seems that the vinegar has slightly eaten away at parts of the volcano, kinda giving it the feel of real lava destroying things in its path, ha. 
 
   
All in all, we love these products. I really hope they will improve their directions, both in the Rigid Wrap and CulluClay Quik-Sculpting Kit and in the ACTÍVA Products' Sculpture KIDS CRAFTS eBook. I did eventually find the full instructions on the website, but it took some searching around. I think it would be helpful if they linked to the instruction page on the product page. The Rigid Wrap was simple to use and the kids really enjoyed crafting with it. I'm eager to use the CelluClay again, with some tweaking of the amount of water. The possibilities of these products are endless!  


Here you can watch my 11-year-old create a vase with the Rigid Wrap. Super simple. And though the video is sped up, it only took him 7 minutes in real time to create it. You can see how he chose to wrap the top also, whereas his younger brother decided to leave it uncovered (in the vase and roses picture above). The best part of art is your creativity and uniqueness!


You can connect with ACTÍVA Products on the following social media sites:


You can read more reviews with fun projects made by kids on the Homeschool Review Crew blog.

Crew Disclaimer
Pin It

Tuesday, December 13, 2011

Make It Monday: Gingerbread Play Dough

The kids and I baked up a batch of gingerbread cookies. But instead of cookie dough, we used play dough; and in place of the sprinkles we used googly eyes and beads. And technically, instead of baking we smashed them up to make them again and again! Either way, the house smelled delicious!


 They were so excited to make the dough. We even had a couple extra helpers.


Dump the dry ingredients into a bowl. Jake was impressed by how pretty it looked with the different shades of brown.


Use your big strong muscles to mix it up.


 Add the wet ingredients.


 Combine well. Once it gets too thick to mix with the spoon, knead the dough with your hands.


They had a very hard time waiting until the dough was completely cool before they started cookie preparations. In fact, they didn't wait. They dough was still slightly warm when they first rolled out their dough and began cutting their shapes.


We had our very own bakery setup in the kitchen. 


 We baked up some traditional gingerbread men . . .


 and Christmas trees.


And some not-so-traditional cyclops trees with pink bellybuttons . . .


 and even a pet rock cookie.


We certainly have been busy. We are now officially open for business and taking orders for all your Christmas needs! 


The kids (ok, me too!) had so much fun rolling, cutting, and decorating our "cookies." They really did look and smell like the real things. Jake asked a few different times, "Can we bake these for real? They smell so good!" A tablespoon or two of some of these spices might be a little costly to be used for something like play dough, but I expect it to last a long time. In fact, the play dough we made last year is just about on its last leg. It's survived 3 kids for over a year. Definitely cost effective. I actually ended up finishing off a few of our spices to make this dough, so I'd better add them to the grocery list for our annual baking extravaganza coming up! Besides, now we'll have fresh spices for our real baked goods.

My favorite part was a conversation that took place between the 2 kids -
Jake: "Look, the candy canes look like J's for Jesus."
Alyssa: "And for Jacob!"
Jake: "Yeah, but Christmas isn't about me. It's all about Jesus."
And he couldn't be more right.


Gingerbread Play Dough
Ingredients:
2 c flour                                           1 Tbs cinnamon
1 c salt                                            1 Tbs nutmeg
2 Tbs cream of tartar                      2 Tbs vegetable oil
2 Tbs ginger                                    1 1/2  c boiling water

Directions:
1. Mix all the dry ingredients in a bowl.
2. Add in the vegetable oil and boiling water.
3. Mix well. Once the mixture becomes too thick to stir with a spoon, use your hands to knead it until it is soft and thoroughly combined.
4. Allow mixture to cool before playing.
Pin It