Showing posts with label Theory Thursday. Show all posts

Thursday, August 9, 2012

Theory Thursday: Solar Robotics

Solar Robotics!? Yes, Sir/Ma'am! My young kids are doing solar robotics already. Well,... kinda.

Jake and I went to Maker Faire Detroit this past Saturday. That was a blast. Yes, there is a post coming on that. While we were at Maker Faire we visited the Maker Shed and picked up the 6-in-1 Solar Robotics Kit. This is a kit that contains two trees of plastic parts a tiny motor and a small solar panel. It brought me back to my model car days. Cutting all the pieces from the trees, trimming the excess stubs, and filing any piece that needs it. In this case I only filed the wheels for the car.

I took care of the minimal assembly of the gear box and the solar panel housing. Not a difficult task, but with the tiny wires on the motor and some other concerns I thought it was best that I did it.

After testing to see that all was working, it was time for the fun part. I called the kids into the kitchen again and we started building the six projects. We started with the solar puppy because it received the highest votes. Now, the box does say 10+ and I would say to stick with that if you are not helping. As long as I was telling them exactly where to put each piece all went well. Jake of course wanted to try and assemble the puppy by just looking at the picture, but that was not gonna work for him. In the end the puppy was assembled without a hitch. The pieces went to together beautifully.

Of course we couldn't stop with building just the puppy so we went on to build all of the projects. I did save one to assemble after they went to bed. Thus giving them something new to see in the morning.

So what did we learn, well... i didn't get to in depth with how the solar panel works. As I explained it to them the solar panel simply takes the light and converts it into electricity. Way over simplified but just right for three kids six and under. What they did figure out was that the closer, or stronger, the light got the faster the motor spun. In the end we learned something we can build on later and had fun doing it. Looks like a winner of a Theory Thursday!

Check the video below to see our solar puppy in action.


Pin It

Thursday, July 26, 2012

Theory Thursday: Ice Melt

You know that empty space in the back of cabinets where two sets meet? Some people have a lazy susan in a corner cabinet. Others have a big cabinet off the back to utilize that space. We have a mini fridge there. It was in the house when we moved in, and we left it there. Since it's right next to our kitchen table and it's small, we keep our drinks in it. Once a year or so, the freezer portion builds up so much ice that the door will no longer close and we have to defrost it. We usually know when it's time when we walk into the kitchen and find a trail of water running through it. It goes something like this: 

Ugh, there's water everywhere! Who spilled something? . . . Oh, it's coming from the fridge. 
Who left the refrigerator door open???  . . . {push door closed. door pops open. push 
door closed. door pops open.} Aaaaah, the ice is built up again.

I grab towels to soak up the river trickling from the fridge across the kitchen and turn off the fridge. Later on, after it's had a chance to thaw a little, we (and when I say we, I mean Leighton) pull out the ice chunks and clean up the rest of the water.

Our yearly adventure happened a couple days ago. The dialogue was similar to the above. The events follows mirrored the example, as well. But as Leighton was opening the front door to throw the ice outside, I stopped him. We could turn this little inconvenience into a science lesson.

There was no major prep involved. There weren't lots of steps to take to reach the outcome. There wasn't even anything to make a huge mess. 

We simply left the bucket filled with ice in the kitchen.

Exciting, I know.


I asked the kids what they thought would happen to the ice. They knew it would melt, but how much would be melted by morning? All? Some? Here are their predictions:
 
Jake: "mostly melted"
Alyssa: "all melted"
Zac: "big ice!"


What do you think happened???


Here's what it looked like about 6:00 am, roughly 9 hours after the above photo was taken:


I know it's hard to see and the quality is very poor, but that little part in the middle was all that was left. It was about the size of a regular ice cube.

Jake ran to the bucket when he got up a couple hours later. He looked inside, but didn't say anything. He just walked away. 

Me, already knowing the answer: "So, what does it look like?" 
Jake, grumbling: "It's all melted." 
Me: "Who was right?"
Jake: "I don't really remember." (He does not like to be wrong.) 
Me: "Oh yes you do. You said it would be mostly melted. Alyssa was right."
Jake: "You stuck it in the oven!"

Yes, son. It's all just a big conspiracy. Our sole purpose is to make sure you are always wrong. Silly boy.  We did not tamper with the results. I suppose the result was relative though. Had he gotten up when I did, he technically would have won. But if Alyssa still got up when she did, she also would have won. Technically. It could have been potentially confusing. But it wasn't, and she was quite proud of herself for guessing correctly.  


So, in a year or so, when the ice in the freezer backs up and the door won't close and we find water all over the kitchen, Jake will remember how long it takes the ice chunks to melt. And he'll be right. 

But next year we'll put the bucket in the fridge after he goes to bed so it won't all melt. Because you know, it is all just a conspiracy.

Pin It

Friday, July 6, 2012

Theory Thursday: Ice Excavation

What better way is there than to spend these hot summer days playing with ice???

Playing with ice and applying science, of course!


This activity requires time and easy prep. You'll need some sort of container, many miscellaneous trinkets, water, and various excavation tools.

Start by pouring a small layer of water in your container and place it in the freezer until frozen. Add another layer of water and a few trinkets. Put it back in the freezer. Repeat the process until the container is completely full or until your desired fullness.

Some trinket ideas are buttons, coins, paper clips, rubber bands, twist ties, Legos, foam shapes/letters, beads,  screws, pom-poms, keys, balloons, rocks, marbles, and whatever other little things you can find lying around. Long items like rubber bands and twist ties require more chipping and patience. While small items like beads and buttons are easier to extract and produce quicker satisfaction.

Once your ice block is completely frozen, remove it from the bowl, gather your tools, and head outside. 


 We used warm water to melt the ice.


 We tried pouring the water through a tiny funnel to concentrate on a certain spot.


We sprinkled on salt to dissolve the ice and make it easier to chip away. The salt left the ice pitted with little holes.

We also used other tools such as spoons, forks, and picks to dig into the block.


But their favorite was definitely the hammers!

Every time they'd hit the block, ice flew everywhere! Whether it was a big chunk or little specks, it was exciting to experience. 


We even flipped the hammer around and used it like a pickax. That really sent the ice soaring!


There was a surprise tool inside one of the blocks. Once Alyssa freed the screw from its frozen prison, we used it and a hammer to chisel away the ice.


We inspected the objects and the variances in the ice. Some parts were smooth, some had cracks, and other areas had tiny bubbles.


It was so exciting when we'd get a portion of an object partially excavated. The kids would grab it and try to yank it completely out of the ice. When that didn't work, they'd have to go back to chipping away at it.

They had so much fun with this ice excavation. Jake extracted all of his objects, convinced Zac to let him help with his, and tried to sneak a few items from Alyssa's block. He declared that this was "one of the best things ever!" He's asked at least 2,000 times - give or take a few dozen - if we can do this again.


Definitely.


Pin It

Thursday, June 14, 2012

Theory Thursday: Mini Volcanoes

I saw this idea on Pinterest, though the link led to only a picture and not a blog. It is such a simple activity and takes seconds to set up, yet the result never get old. The kids always find the reaction of vinegar and baking soda fascinating. Vinegar (acetic acid) and baking soda (sodium bicarbonate) react to form carbonic acid. Since the carbonic acid is unstable, it immediately breaks down to carbon dioxide and water. The bubbles are the result of the carbon dioxide escaping.

The kids don't care why it works. They're just happy that it does.


You'll need vinegar, baking soda, food coloring (optional), something to contain the baking soda, something to hold the vinegar, and something to dispense the vinegar.

Mix the vinegar and food coloring in the cups and dump baking soda on the plates.

Next comes the fun!


 Squirt the vinegar on the baking soda to make it bubble and foam.


The more vinegar you use, the bigger the reaction will be.


And the bigger the smile!


It'll make little craters all over the plate.


Continue making volcanoes until they no longer form.

Then you'll need to dump it and fill the plate with fresh baking soda so you can do it all over again!

And again. Until you empty your baking soda box and need to purchase more.


Of course, they weren't done though. They dumped it all in a bowl, like the rain in a jar experiment, and continued experimenting.


 And just like before, they made a big mess and we transferred outside.

They added grass, sand, sticks, water, and whatever else they could find. They tested theories and mixed potions. For over an hour. 


The analysis? Lots of hands-on learning fun.


So, whether you're erupting mini volcanoes or continuing further exploration, take time to investigate the laws of science.


And have fun!

Pin It

Friday, May 25, 2012

Theory Thursday: Oobleck

This is one of our favorite experiments. Anything that is goopy, gooey, messy, gluey, slimy, grimy, hands-on fun is always a favored activity in our house. Even my 2 year old has started to ask daily, "We do science?"

So what concoction has taken the number one spot?

Oobleck!

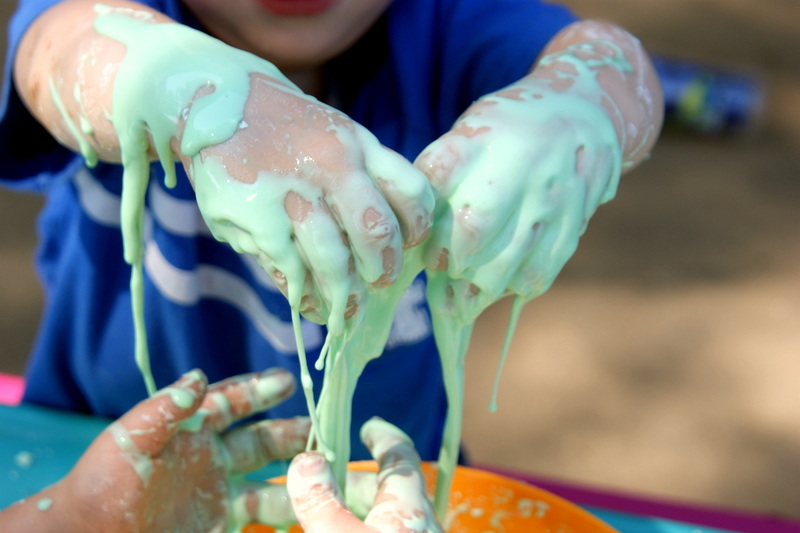
It gets it's name from Seuss' Bartholomew and the Oobleck, but isn't nearly as invasive. It's actually a non-newtonian fluid whose flow properties differ from other liquids. In other words, it can be both a liquid and a solid. 

Not only is it really fun to play with, but it's also super simple to make. And I bet you already have the ingredients in your kitchen.

You'll need 1 cup cornstarch, 1/2 cup water, food coloring (optional), a bowl, and a spoon.


Dump the ingredients into the bowl and stir.

Or try to stir. 

The mixture instantly takes on the solid form and makes it difficult to combine thoroughly. Jake told Alyssa, "Here, let me do it. I have muscles." Even he struggled though, and I took over. 


 Then came the fun! They all tried touching it and were surprised how firm it was.


 But once they had a handful of it, it slurped out of their fingers as it changed back to a liquid.


 They rolled it into balls and said it was like play dough.


 Once they released the pressure, it change back into a slimy glob.


They loved this stuff! Jake even sang an oobleck song as they experimented. It's gotta be pretty special stuff to deserve its own song. They played forever with it, scooping it up and watching it drip back down. They've already asked when they can play again.

That is, if I let them play again. I just might keep this stuff to myself! 

Yeah, it's that fun.

Pin It

Thursday, May 10, 2012

Theory Thursday: Rain in a Jar

Some experiments are fun to do. Some are even more fun once the planned experiment is over.

This one falls into the second category.


I first saw pictures of this experiment on Pinterest (though the picture didn't lead to a link to credit) and knew that I'd have to do it with the kids. Then, last week they were asking me how it rains. When Thursday rolled around again . . . and it was raining outside. . . I knew exactly what to do.

Make it rain inside too!


All you need is a jar of water, shaving cream, food coloring + water, and something to squirt (eye dropper, syringe, pipette, etc.)


Spray the shaving cream in the jar to resemble clouds.


Get some of the colored water.


And squirt it on the shaving cream clouds.

You could also drip food coloring straight from the bottle directly on the cream, but
1) I didn't trust my kids with the food coloring, and
2) This way they got to play more without using too much coloring.


Once the "clouds" are filled with water . . .
 

It starts to rain!


Continue having fun filling your clouds and making them pour rain.


Try adding other colors to really make it storm!


This visual was a good way to explain the process of rain. The kids thought it was really cool and had fun.

But wait. There's more!


After our downpour, we dumped the colored foamy water into a bowl.


And added more shaving cream, of course.

And spoons.

And paper towels.


And made a mess.

Or two.

Or too many to count.


They squished and stirred. Smashed and squeezed. Splashed and sploshed. 


They played and experimented for nearly an hour.


Zac's favorite part was smacking his hands together and splattering the kitchen with bits of shaving cream. I had speckles on the walls, on the chairs, in between the window blinds, and covering the children.

I finally called it quits when they got too rowdy and tipped the bowl, spilling the concoction on the floor for the third time.

I placed the bowl in the sink and sent the kids to prepare for bed. As I was cleaning up the mess on the table, I noticed Zac.


The little stinker carried the step stool to the sink and continued with his experiment. I think he may have been having a good time.


Sure, making it rain in the jar was fun.

But  experimenting and creating by following their own imaginations was even more exciting.

And messy.

But mostly exciting.

Pin It