Showing posts with label STEM learning. Show all posts

Wednesday, July 15, 2020

Pitsco STEM Pack

Disclaimer: I received a FREE copy of this product through the HOMESCHOOL REVIEW CREW in exchange for my honest review. I was not required to write a positive review nor was I compensated in any other way.



Hands-on learning is a priority in our home! I believe in the importance of learning by doing, so I love when we review resources that are focused on actively engaging. This Middle School STEM Creator Pack from Pitsco Education perfectly meets our needs.

Pitsco Education has been dedicated to hands-on exploration and problem solving for over 40 years. Their materials and curricula are STEM-based, meaning they incorporate science, technology, engineering, and math skills while making real-world applications. Their philosophy of education, "What will you bring to the world?" is manifested through experiences that engage both hands and minds. It is their desire to put a piece of the world in students' hands and help them understand how it applies to their lives.


The STEM Creator Pack is geared toward the 6th-8th grade crowd. It includes all the materials, instructions, and curriculum to build 5 projects with 15 activities.

  • Catapults
  • Balloon Cars
  • Da Vinci Bridges
  • Personal Inventions
  • Friction Climbers

All the projects come individually bagged with everything you need. I have been doing hands-on activities with my kids for more than a decade; I am not afraid to gather random household supplies to complete an assignment, but this kit is so convenient! It cuts back on excuses for not doing projects with your kids such as not having enough time or not being able to find materials or not wanting to look for ideas. All you have to do is grab a bag. Truly, it could not be simpler!


Even though the kit was designed for middle schoolers, I chose to use the Creator Pack with my science-loving, engineer-minded, always-building, busy boys ages 5, 8, and 10.

Each project comes with a Creator's Guide booklet which includes step-by-step building instructions with pictures, interesting facts, and engaging questions. I found that since the instructions are written in an easy-to-understand way and have visual clues for each step, my boys did not even need my help with building some of the projects. Even my second grader had no trouble with things such as folding the car template, taping it, and assembling the wheels. Though I did help with cutting it out and teaching him how to score for easy folding, he was able to follow their instructions just fine.


Most of the projects also include additional activities to extend the learning. For instance, after the boys each took a couple turns playing with the catapult, there were 4 suggested ways to use it: testing the distance, hitting a target, designing a multi-player game, and playing the game. Each activity lists needed supplies (some of which are not included in the kit, but are common), instructions, charts for recording data, and additional relative facts and discussion questions.

Some of their favorite times were testing their theories and trying new ways to use their projects. They learned the best placement of the straw to get their balloon-powered car to go the fastest, that the friction climber is a fun way to get a Lego minifigure to higher heights, how to accurately shoot the catapult so someone can catch the projectile, what happens when you change the angle of a ramp, and various other real-world things.


We did not have the best of luck with the Da Vinci bridge project, unfortunately. That was one set of instructions that I found confusing. Even my engineer husband who easily understands things like this had a difficult time getting the popsicle sticks to stay together long enough to form a long bridge. That is one that we will definitely have to try again as a family.

We still have one final project to complete. They saved their favorite for last--creating their own inventions, which opens up all possibilities for creativity. The kit comes with tons of provided materials like chipboard, string, clay, spools, rubber bands, and straws, but encourages the use of any supplies. There are a few suggested inventions, but  the main purpose is getting kids to come up with ideas--whether it's improving something or creating an entirely new concept--and then creating them. I know that my boys will spend days being engineers and testing their contraptions.

 
My boys absolutely love this kit! It's fun, engaging, and gets them doing what they love best--building and creating.

I absolutely love this kit! It's organized, thorough, easy-to-follow, and gets my kids doing what I love best--learning by doing. 


Pitsco Education is generously sharing their learning kits with their followers! You can enter to win your own STEM Creator Pack by filling out a brief form for the giveaway. Good luck!  Then you, too, can create this fun catapult like my boys did.


Middle School STEM Creator Pack is a must-have for anyone who values hands-on education, incorporates STEM activities, or just likes to have fun. It's the perfect summer activity kit as you can grab a bag once a week and learn without feeling like work. They offer products focusing on robotics, aerospace, coding, sustainable energy, drafting, structures, and more, so there is something to pique your child's interest.

I can't wait to surprise my little engineers with more hands-on fun from Pitsco Education!


You can connect with Pitsco Education on the following social media sites:


Pitsco Education offers many fun and engaging learning products. My Crewmates were able to review things such as elementary and high school kits, coding cubes, Smart Buddies, and Arduino kits. You can read more reviews of these products on the Homeschool Review Crew blog.


STEM At Your Fingertips - Elementary, Middle & High School STEM Kits {Pitsco Education Reviews}
Pin It

Thursday, October 17, 2019

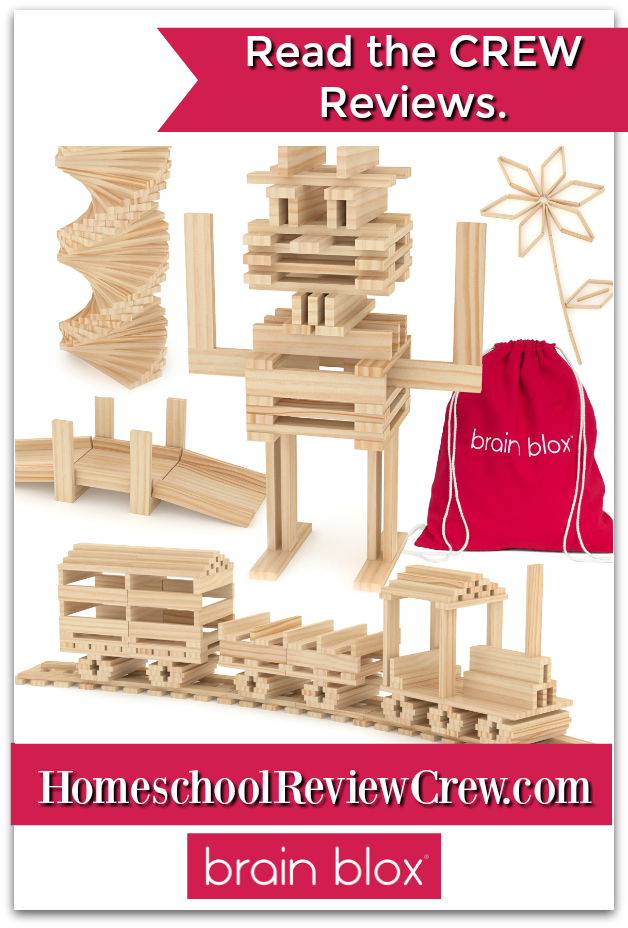
Brain Blox Wooden Building Planks

* This post may contain affiliate links.


Anyone who knows our family knows that we thrive on hands-on learning in our house. I am a huge supporter of learning through play, and this review is perfect for our style of education. I know I review a lot of curricula, but when people ask me what to use specifically with their preschool and kindergarten-aged kids, I always tell them to let them play! The benefits of playing--especially during the younger years--are so vital. You know the old proverb about teaching a man to fish? That doesn't apply to only adults. Let kids learn by doing.  

Brain Blox is a family-owned company with that same belief. Their mission is to create products that encourage intentional and meaningful play as it nurtures brain development and confidence. I already explained about their Fun Family Chess, a new version that teaches the game with a gentle new approach but can also be used as a traditional set. Today, I'm talking about their Brain Blox Wooden Building Planks.


We first played with building planks like these at a science center years ago. My kids were quickly drawn to them as the planks appeal to their engineering minds. They spend time every day building something--anything--with Lego bricks and other building mediums. One thing that's different about these planks though is that there is no snapping of pieces together. Like blocks, these are used simply by stacking and are held in place by gravity and friction.

Another thing that's different about these planks is that the pieces are all the same shape ad size. Each building plank is approximately 4.75" x 1" x .25" solid New Zealand pine. They are precision-cut, chemical-free, and non-toxic, making them a perfect option for kids.  All of the edges on our planks are smooth with no worries of producing splinters. A red, canvas, drawstring backpack-style bag is included to store the pieces.


The building possibilities with these are endless! Truly, if you can think it, you can build it. I have been impressed with the creations my kids have made: pirate ship, table and chairs, army tank, houses, bridges, and countless towers of various designs, to name a few. Some of the builds were born out of their imaginations, but others were inspired by the Ideas Booklet that is included with the set. It features 15 building ideas by showing a pictures, how many planks are needed, and a tip or challenge for each one. No other instructions are given, requiring the user to depend on visual cues and thinking skills.

You can find many more suggestions in the free Idea Cards download. There are over 70 picture cards that cover 8 levels of difficulty starting with simple two-dimensional designs to complicated three-dimensional creations. Even my 4-year-old is doing well with the higher levels.


The company is currently creating free curriculum instructions that focus on reading, math, physics, and more that you can use intentionally in your lesson plans. The activities teach concepts such as the ability to perceive a 3D rendering from a 2D image, manipulation of spatial information, linear thinking, fine motor skills, and more. If you're just looking for a quick learning activity to sharpen thinking skills, there is a collection of brain puzzles using the planks that include the directions, hints, and the solution. These are one of my personal favorite aspects of the set. I love watching my kids use their brains to figure out the puzzles!  

If you're looking for even more ideas, Brain Blox has also put together a a World eBook filled with additional design ideas from walls and fences to planes, trains, and automobiles and many other things. There are also suggestions for creating characters on the planks and the collection of brain puzzles. They offer tons of options to ignite creativity and learning. 


To say that my kids (ages 13, 11, 9, 7, 4) like these is an understatement. As soon as one of them dumps the bag out on the floor, the others are right there grabbing planks to start building. We have the 200-piece set, but we've already been eyeing the larger one. After all, Christmas will be here soon, and adding more of these fun and versatile building planks would be a fantastic gift. My kids love to show off their creations and enjoy building when their friends come over. Their current obsession is using the planks for contraptions for a Rube Goldberg machine. We've been having so much fun applying engineering, problem-solving, critical thinking, and cause-and-effect skills.

The Brain Blox Wooden Building Planks are a fantastic resource for everyone! Whether you're looking for intentional play, specific learning, or just a relaxing activity, these building planks are perfect. They are well-made, versatile, and loved by all.


You can connect with Brain Blox on the following social media sites:

Make sure to head over to the Schoolhouse Review Crew blog to see more amazing creations using Brain Blox Wooden Building Planks.


Brain Blox Wooden Building Planks {Brain Blox Reviews}

* Some of the links in the content above are affiliate links. If you click on a link and purchase an item, I may receive an
affiliate commission. Regardless, I recommend products or services that I have used personally and all the text and
opinions are my own. I am disclosing this in accordance with the Federal Trade Commission's 16 CFR, Part 225.

Crew Disclaimer
Pin It

Friday, March 22, 2019

60+ STEM Challenges


Our family thrives on hands-on learning! Whenever we get the chance to review materials that get us physically working to learn gets us excited. You can often find a random experiment jar on the counter or a project on a table or a child or two working to complete a fun challenge. I am a firm believer that people learn better when they do and try to incorporate that philosophy into the upbringing of my children.

When we're not actively learning though, we focus on literature. We spend a large portion of our school day reading. I've explained many times that our education is literature-based with an emphasis on hands-on learning. So combining the two means of learning like Tied 2 Teaching has done with their STEM Activities, Full Year of Challenges with Close Reading seems pretty perfect to me. 


Matthew Kelly, founder of Tied 2 Teaching, has been teaching in the classroom for years. He has created over one thousand materials to be used with students PreK-8th grade, ranging from language arts to character development to geography and more. His passion for math and science education inspired this collection of seasonal STEM Activities. He and his wife also homeschool their 4 little ones.

Are you familiar with STEM? It's all about science, technology, engineering, and math. Focusing on these topics encourages problem-solving and innovation, aids in the application of knowledge, and fosters a love of learning. This STEM Activities bundle comes as individual downloads that can be divided by month to keep kids active and learning all year long. The exercises are seasonally matched and include extra fun "holidays" like a droid challenge in May to celebrate "May the 4th" for the Star Wars fans, a pencil tower challenge in September to celebrate "back to school," and a hat for cat challenge in March to celebrate both Dr. Seuss' birthday and National Reading Month.


For example, here is what you can find for Easter and Earth Day in the month of April:

  • Jelly Bean Tower 
  • Design a Carrot Carriage
  • Design Something Useful
  • Upcycled Birdhouse

Each challenge begins with an online close reading text (short, high-interest reading passage). The reading can be accessed through a QR code, a link in the download, directly on the site (which also contains ideas for additional activities and links on the subject), or a printed copy. There are a handful of questions to help students better grasp the materials and get them to think. Questions about definitions and synonyms are straightforward, but others asking "Why do you think . . ." and "What sentence in the text supports your answer" can vary greatly. 


Next, the student is introduced to the challenge. There is criteria, material suggestions, the final product requirements, and pictures examples from Matthew's own students. 

It's always good to have a plan. Before the student gets to creating, he can write out his ideas. There are a few different page format options that give space to write, draw, and solve. What do you already know about (insert challenge)? What will it look like? Explain its design. What is one way you could make it even better? Of course, there is also a space to draw a sketch. 

Next is the fun part--completing the challenge! This can take as little as 30 seconds (like the Eiffel Tower challenge) or as long as you have the time, patience, and interest for. With homeschooling, we have the flexibility to work as long as we like. Some challenges took 10-15 minutes, while others lasted an hour or so. As long as there is interest, we keep working. Obviously, things that are painted or glued will take a longer time from beginning to end to complete. 


After the challenge itself is completed, there are follow-up pages. The student is asked to list the steps he took to meet the challenge, explain why or why not his design was successful, describe which parts went well, and so on. There is also a page for him to recognize how each aspect of STEM was included in the challenge. Each question is meant to strengthen thinking skills.  

Just as I suspected, my kids love these challenges! We complete at least one challenge a week together as a family, but use them as one-on-one time when a child is needing something extra to do, too. The challenges are geared toward grades 3-6. I have kids both older and younger than the recommended ages. My little ones need some extra help and my middle schooler is a bit advanced for some of the activities, but overall, this is a great resource that can be adapted for all ages. 


I have been reading the close text aloud and discussing the material with the kids. I love times like this as it always encourages further study, like looking up ticket prices for going up into the Eiffel Tower or researching shipwrecks and their locations. The information in the download is both a great starting point for a full study and a great stand-alone product. I love that each challenge can also supplement additional studies, like last month when we were learning about spiders and included the spider challenge from here.

My kids love the open-ended challenges, as they get to show their creativity. It's so fun to watch their minds work and how each one is different. We have been discussing the questions and thinking activities aloud together, but I can see how students could benefit from writing out their answers.

I love how their personalities shine through in their designs, too. For instance, during the Design a Treasure Chest challenge, my 9-year-old said, "I'm going to make one really, really, really big. Because what I want to put in it is you!" And then, because he couldn't keep me in a box, he made one to hold a picture of me from high school that he keeps framed next to his bed.


We haven't worked through all of the challenges, but we have found a mistake. The close reading in the Construct the Eiffel Tower directs to the reading for the Design a Zip Line. However, it is easy to search for Eiffel Tower on the site and the correct reading comes up. It is the same as Design a Building Block Structure, but the close reading questions are different for the two challenges.

We are greatly enjoying these STEM Activities, Full Year of Challenges with Close Reading. I appreciate the variety of activities that are included and love the addition of the close reading texts. This resource perfectly sums up our schooling style. I can't wait to see what other fun things we'll do throughout the year.


You can connect with Tied 2 Teaching on the following social media sites:
Facebook
Instagram
Pinterest


You can find various other STEM challenges included in the download by reading more reviews on the Homeschool Review Crew blog.

Crew Disclaimer
Pin It

Friday, April 8, 2016

LEGO Stop Motion


LEGO. If ever there was a review that my kids immediately fell in love with and wanted to use all the time, you can be sure that there is LEGO involved. To say that our family is obsessed with LEGO may be an understatement, ha. Our newest hobby has been using the tens of thousands of tiny bricks that we own and transforming them into stop motion videos using the Stopmotion Explosion Animation Kit.

My husband has always been a fan of  claymation, and in turn all kinds of stop motion films. He played around with some LEGO stop motion using a simple app a while ago and piqued the kids' interests, too. He made a couple short clips and left it at that. All it took was this kit from Stopmotion Explosion to rekindle the stop motion excitement.


The kit includes everything you need to create your own stop motion videos.

  • Camera -- 720p resolution; Windows and OS X compatible; manual focus; full control of exposure, color, and white balance; tripod or table mount; fully-rotating head. 
  • Stopmotion Explosion Animate ANYTHING and Make MOVIES Book -- This 290+ page book contains everything you need to know to make amazing stop motion films. It has detailed step-by-step directions for screen writing, video editing, and audio recording. It gives tips on lighting, set design, composition, animation, securing objects, special effects, and more. 
  • StopMotion Explosion Software Disk -- The disc contains necessary files. The StopMotion Explosion software is used for capturing the images. Audacity is where you can complete the audio editing. There are also dozens of sound effects clips and extras.

We had gotten home very late the day our kit arrived. Normally, we would have put the kids to bed and shown them the contents of the package in the morning. Since we knew they would be thrilled to get it, we let them open it that night. (Ok, maybe my husband and I were just as excited as they were, ha.) There were squeals of delight. They couldn't wait to start playing around with the program.

My husband installed the software and made a quick test video to see exactly how this one works. Jake, our 10-year-old, wanted to start immediately, but we made him read the first few chapters of the book before starting, so he understood more. Of course, he flew through the beginning of the book and got busy creating his own stop motion film.

We had planned to borrow my mom's collapsible photography studio for the videos, but we hadn't expected the kit to arrive as quickly as it did and had not gotten the studio at that point. Jake didn't care about a distraction-free film and simply set up his scene on the kitchen table. As a result, his first video was dark and had the cord from the camera across all the images. I pointed that out to him and he made sure to watch out for it the next time. His first few videos were like that; I'd mention an aspect of his video that could be better, and he'd change it for the next time. 

He made this fishing video after a couple weeks of playing with the program.


He watches that video now and can point out things he'd like to do differently. For instance, the camera wasn't straight, which made the video tilted. Also, the scenes change quickly. When he added the audio after the pictures were created into the initial film, he realized he didn't have much time to say the things he wanted to.

There is much work involved in making a stop motion film. Not only do you have to take the pictures of the characters or objects in different positions, you have to make very small movements with them, otherwise, it moves too fast. Place your object (in our case, a mini fig), take a picture, move it slightly, take a picture, move it a little more, take another picture. It can almost get tedious. Jake's first few attempts were very fast-paced. He learned to make smaller movements and ultimately, better films. His fishing video is only 1 minute and 12 seconds long, yet there are 764 individual pictures that he took to make it.


There is much more to making a stop motion video than simply taking pictures after minuscule movements.

  1. Take pictures.  
  2. Export the pictures as a video file.
  3. Open the video in Windows Movie Maker (or another video editing program. This is what it recommended it the book, though we used a more recent version.)
  4. Record audio and add effects (credits, fade in & out, text, color balance, etc..) 
  5. Process the file to save as a video.

Jake was shown how to do each step one time. After that, he was able to set up everything on his own with no issues. Making stop motion videos has been a big deal at our house the past 6 weeks or so. And it wasn't just with Jake either. Oftentimes, all the kiddos would work together to create something or just to simply watch someone else work. Each of the other kids (8 yr, 6 yr, 4 yr) has made his own videos. The younger ones haven't added audio yet, but even our 4-year-old loves setting up a scene and taking pictures. 


One of the things we told the kids is that we would do a stop motion of building a set. Of course, we couldn't just take apart a set we already owned. This was a great opportunity to purchase a new one! My husband and I picked out the corner deli, for a few reasons. For one thing, it will work perfectly with some ideas we have for future films we're planning to make.

The kids helped their dad build the set, and then he added in the sound effects by himself. He put it together one night after the kids had gone to bed. The two of us laughed at the different option that are included with the software.

This is the final video:


Another product that Stopmotion Explosion sells is ModiBot Mo. This little guy was created to pose in a variety of ways, more like a human. The mini figs are great for LEGO-lovers, but sometimes you want a more flexible leading character. ModiBot Mo is a fun option for films. You can even purchase an accessory kit that includes a sidearm, field knife, rucksack, treadsoles, headphones, and a baseball cap.

Jake read about Mo in the book and decided to build his own modibot using, LEGO, of course. I was quite impressed with his creativity and the flexibility of his guys. He used some of the techniques found in the book for his fighting sequence. See if you can spot things like an uppercut, left hook, or roundhouse kick.

 
While this program is fantastic, there are a few things that we have been less-than-impressed with, and they all have to do with the camera. First of all, the clip is not strong and doesn't attach well to things. It easily wobbles if there is movement near it. Secondly, it's difficult to focus the camera. Because of the design, the dial does not turn easily, which makes it hard to keep the camera steady as you focus. Once the camera moves even just a tiny bit, you have to realign it to keep your video smooth. Another thing that was disappointing is that there are no keyboard shortcuts. Many programs will let you scroll through the pictures with the arrow keys along with some other options. While you technically can grab the pictures with the space bar, if you stop to check your live view, you have to re-click with the mouse. There were many times when someone thought they were taking pictures while pressing the space bar, only to find out nothing was done. The final thing that could be improved is that even though the camera says that it defaults to 720p (the highest setting on this camera), it's actually using a much lower quality. Each time you open the program, you have to manually change it to get the 720p. All of our first videos were taken at 480p, because we didn't realize it needed to be changed.

Stopmotion Explosion does sell a higher quality camera that looks like it fixes many of the things I mentioned.


Camera issues aside, this kit is amazing. The book is a phenomenal resource for stop motion. The information in it is completely thorough and gives some fascinating tips like how to make an explosion with cotton balls, what sticky notes can be used for, when to use a flashlight, how to make a character fly, and so much more. I'm so excited to see how my kids improve by implementing more of the guides found in the book and seeing how they incorporate the sound effects.

I asked the kiddos what they thought of Stopmotion Explosion.

"It was awesome!"

"The best thing in the world!" 

"It was really fun to do it!"


I have a feeling that stop motion has become part of our lives for good. I'm so thankful we received this animation kit.


You can connect with Stopmotion Explosion on the following social media sites:
Facebook
Twitter


If you'd like to see more reviews of this kit or watch some other fun stop motion videos, please visit the Schoolhouse Review Crew blog.

Crew Disclaimer
Pin It