Showing posts with label tissue paper. Show all posts

Thursday, December 8, 2011

Make It Monday: Tissue Paper Wreaths

This is by no means an original project. In fact, my parents still have one that I made when I was little! The kids and I helped them decorate their Christmas tree last week and we found my wreath. We had a lot of the same recurring conversation that day --

Kids, picking up ornament: "Who made this?"
Me: "I did when I was little."
Kids, picking up another ornament: "Who made this one?"
Me: "I did."
Kids, picking up a different ornament: "Who made this?"
Me: "I made that one, too."

Yes, my mom has kept many, many things that I created as a child. In fact, she recently gave me boxes (yes, boxes, plural) of papers and projects of mine. She also keeps that things that the grandchildren make. My little ones were very excited each time they found one of their own ornaments in the box. "Hey! I made this!" Seeing their own creations from years past brings such a sense of pride.

I thought it would be fun to recreate some of the crafts I made when I was little with my own kids while they're little.


All you need are a paper plate for each person, tissue paper in red and green, glue, scissors, and an invisible pencil. 

Well, a visible pencil would probably work better, but then you'd actually have to remember to put it in the picture of the supplies. Just use whatever works best for you.


And here's a question - who doesn't have regular ol' paper plates in their house? You know, the ones that are flatter and have the ribbed sides and the definite circle in the middle that make it easy to know where to cut.

Apparently we don't. Trust me, I looked. I looked in places that paper plates have no business being. But I was sure we had some. Either way, I had to settle on cutting the raised sides off the ones we did have and making my own circle in the center . . . or the almost-center.


The kids got busy cutting squares out of tissue paper. They cut approximately 3 usable squares, many many scraps of tiny pieces, and handed the scissors and paper to Mommy to finish it off.

 
Then they put the eraser side of a pencil in the center of a tissue paper square and wrapped it up.


Here's another question - totally off topic - Why do my children wear short sleeves and sleeveless shirts in the winter when their mother is all bundled up in sweatshirts and blankets??? They really do own warm clothes - just look back on some posts from the summer. Crazy kids.


They dipped the paper-covered eraser in glue and stuck it to the paper plate. They pulled out the pencil and repeated the process.

Again.

And again.

And again.


Occasionally, they used a red square to look like a holly berry.


These little beauties are hanging on my kitchen window. Now while I'm washing the many dishes throughout the day, I smile as I look upon these creations.

I offered to let them paint the plates green first, knowing that they wouldn't be patient enough to completely cover the plate with the tissue paper, but they were just too eager to get to the gluing part! You could also punch a hole in the top and loop a sting through to hang the wreaths up. You could even glue a construction paper candle to the back of the wreath to shine through the middle.

Or, you could leave them just like this, knowing that years down the road, when the children are grown, you'll all look back on these projects and smile.


Pin It

Tuesday, May 24, 2011

Make It Monday: Tissue Paper Butterflies

This craft has many appealing qualities: simple, frugal, colorful, fun, little-cleanup. And it even develops fine motor skills in many ways??? What are we waiting for? Let's make some butterflies!


Cut up some tissue paper.

* Note to self: Buy another pair of good children's scissors so the 3-year-old doesn't have to use the big adult scissors since her brother won't give up his red ones.


 The size and shape of the pieces don't matter.


Scrunch up a piece of tissue paper and dip it into glue.

You could also squeeze the glue directly on your picture and place the tissue paper ball on top. But do you recall Alyssa and her obsession with the glue bottle here and here??? Besides, dipping was fun and different.


Place the gluey tissue paper onto an outline of a butterfly.

Jake had early plans of making an entirely red butterfly. Surprise, surprise. He did change his mind though and went the multicolored route.
 

We hung the finished pictures in the kitchen to proudly display.

What's that? The picture on the top? No, Zac didn't make one. You didn't think I let them have all the fun, did you? Usually I stand back and take picture after picture while they craft away. This time, I set the camera aside and joined in!

This project will work great for any occasion or picture. Christmas tree, Easter egg, American flag, flower, jack-o-lantern, pizza . . . the possibilities are endless and fun! 

Go grab some tissue paper and make a pretty picture to hang in your kitchen!
Pin It

Wednesday, April 6, 2011

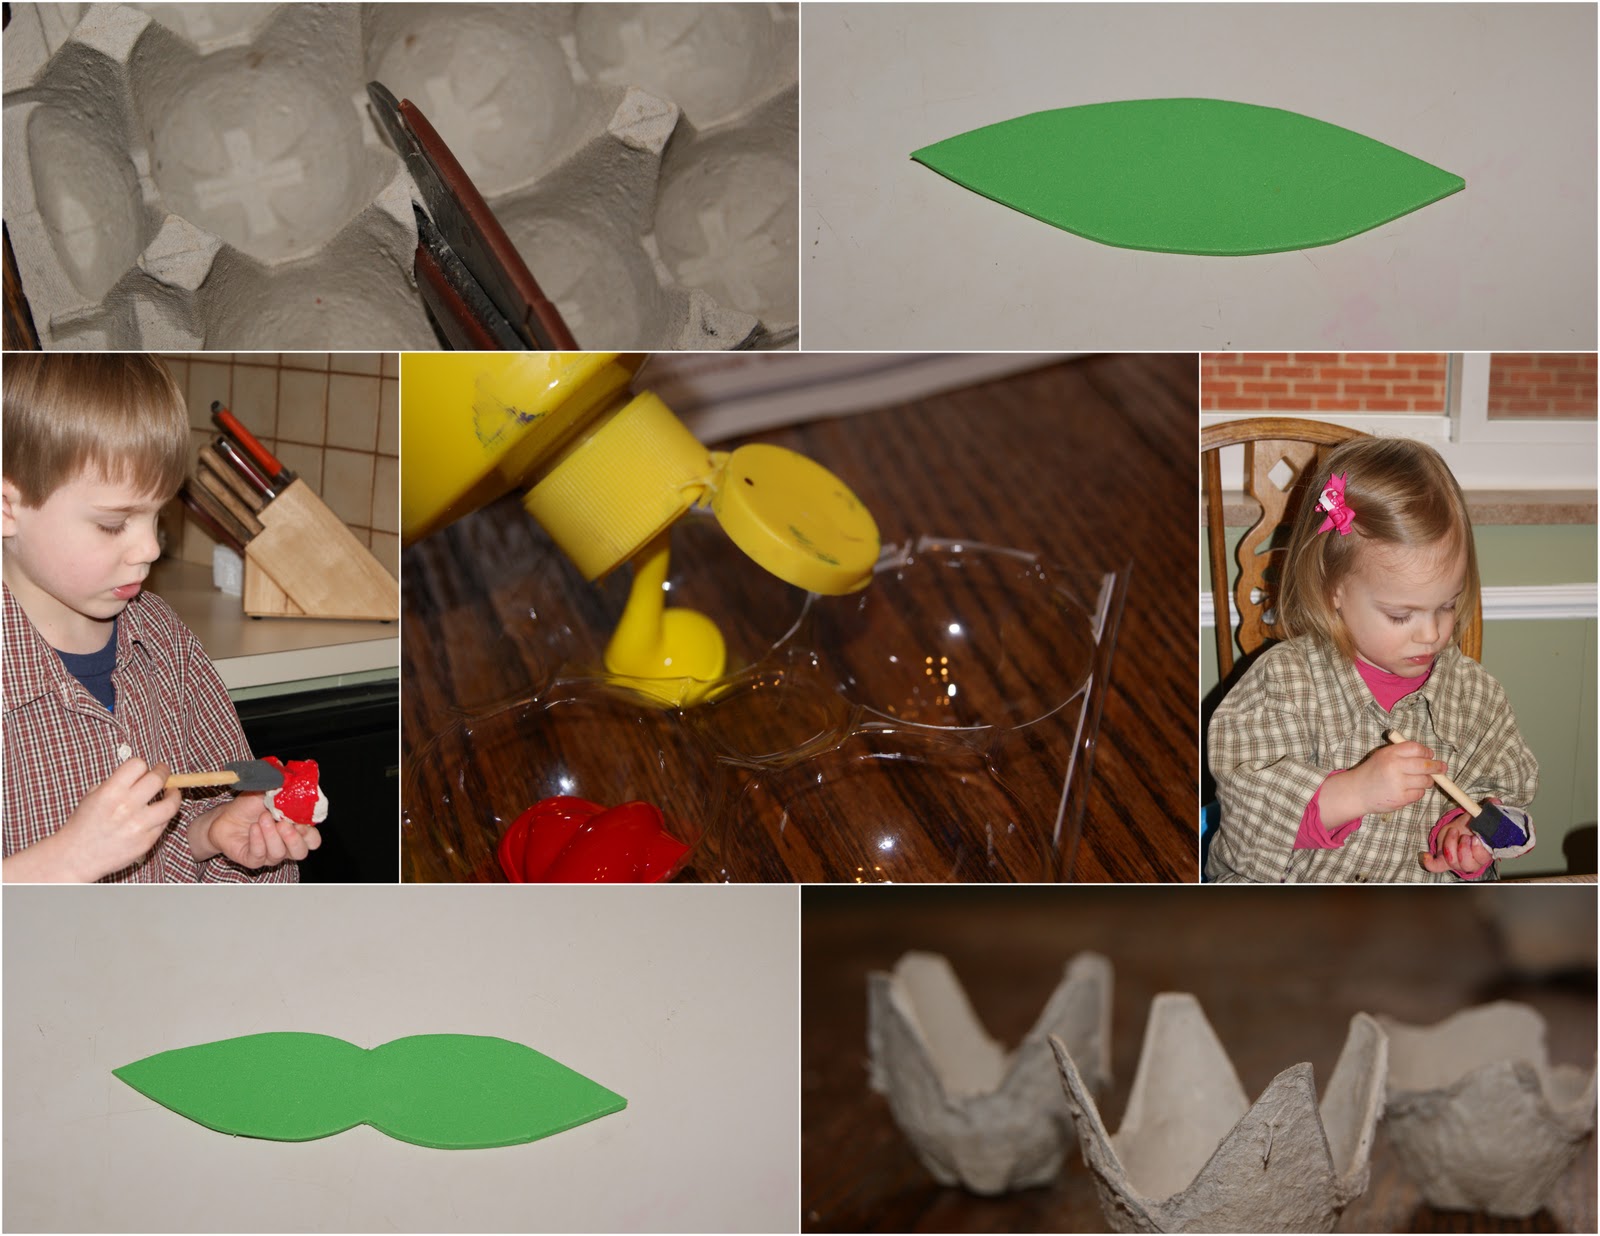
Make It Monday: Egg Carton Flowers

It's been rainy and dark and gloomy. Hello, April. We made these flowers to bring some color and cheeriness into the house.

And because it was Monday.

Supplies per Child:
3 cardboard egg cups                                                             Toothpick
3 pieces (4" x 1 ½") of green craft foam                                 Scissors
3 green chenille stems (or brown, if that's all you have!)        Paint/brushes
6 squares (3" x 3") of  colored tissue paper


Directions:
1. Using an empty egg carton, cut out three egg cups and trim them down.
2. Paint the egg cups. Set aside to dry.
3. Cut the green craft foam into footballish shapes.
4. Use scissors to give your leaves more shape by trimming them into an hour glass type shape.
5. Use a toothpick to poke a hole in the center of each leaf.
6. Poke a chenille stem into the hole in the center of the leaf. 
7. When egg cups are dry, use toothpick to poke a hole in the bottom of each egg cup.
8.  Insert the top of the chenille stem into the hole in the egg cup.
9. Insert the top of the chenille stem into the center of the two tissue paper squares. Run the egg cup up to the tissue paper. The tissue paper will tuck inside the egg cup. Bend the end of the chenille into the tissue paper to hold everything in place.


Jacob and Alyssa did everything themselves, except the cutting. Let me tell you, I didn't even want to do the cutting of the leaves. I almost waited until Leighton came home to do it. Yes, I admit it. Freehand cutting is not my thing. I cut. I re-cut. I shaped. It was a long process. By the sixth set of leaves though, I cut, cut, cut, cut and voilĂ ! Leaves!

The kids liked painted with the foam brushes. They helped fill in the texture of the carton. Jacob, of course, painted all 3 of his flowers red. Everything always red. He also painted the insides of them, even though I  tried to convince him that they wouldn't be visible. It made for some messy fingers. Thankful for washable paint! We used the top of the egg carton to hold the paint. Such an economical craft!

Jacob insisted that we sprayed the flowers so they were more realistic and smelly. Zachy especially liked sniffing them. 

See? All this rain has been good for something!
Pin It