Showing posts with label marshmallow. Show all posts

Thursday, August 15, 2013

Tasty Tuesday: S'mores Brownies

National S'mores Day was this past Saturday.

So, you know what that means, right?

We had to celebrate!

We've made a few variations of the classic treat in the past: s'mores in the oven, s'mores bars with Golden Grahams, s'mores brownie bars, and s'mores ice cream. I wanted something different this time though.


I started with a box of brownie mix and went from there, adding some of this and a little bit of that. And then a bit more of this. My little ones helped, of course, and insured that it was very s'more-esque.

I popped our creation into the oven and sat down with the whole family to introduce the kiddos to Disney's Alice in Wonderland. We laughed at the White Rabbit. We laughed at Tweedle Dee & Tweedle Dum. We laughed at the Mad Hatter.

We laughed a lot.

And I checked on the brownies. And rechecked the brownies.

We didn't have any mini marshmallows, like I had originally wanted to use, so I cut regular marshmallows in half and placed them on top. I wasn't sure if they'd melt before they burned.

But there was no need to worry.

Everything melted into a delicious ooey-gooeyness.

 
And we were so sad when they were gone.

This is one will be making again. Soon.


S'mores Brownies
Ingredients:
1 box Duncan Hines Double Fudge Decadent Brownie Mix, prepared according to package directions
5 whole graham crackers, broken in pieces
13 regular marshmallows, cut in half
1/2 cup mini chocolate chips

Directions:
Mix graham cracker pieces into prepared brownie mix and pour into greased 8X8 pan. Top with marshmallows and sprinkle on chocolate chips. Bake at 350° for 40-45 minutes, or until brownies are done. 


Notes:
You could use any brownie mix or recipe, really. The one I used makes a smaller batch. If you choose to use another, but bake in the same size pan, the brownie portion will be thicker. If you choose to use another, but bake in a larger pan, you'll need to add more of the other ingredients, as well. You can also substitute the regular marshmallows for the minis.

Pin It

Thursday, July 19, 2012

Tasty Tuesday: Marshmallow Pops

Happy 4th of July!!!

Wait a minute. Yesterday was Fathers Day and today is July 4th???

I'm so confused.

Maybe I'll post something about Christmas tomorrow, just to keep you guessing.


These marshmallow pops are so quick and easy to make. Even easier than the brownie pops. (Though not quite as tasty. Shhh, don't tell my kids.)


 You'll need marshmallows, chocolate (we use Wilton candy melts), sprinkles, and sucker sticks.


 Start by putting the marshmallows on the sticks.


Melt the chocolate and dip the marshmallows into it. Tap the stick on the side of the bowl to remove the excess chocolate.


Working quickly before the chocolate hardens, add your sprinkles.


And last but definitely not least


Enjoy!

See? I told you they were easy!


Now, to start on that Christmas post . . .

Pin It

Wednesday, April 4, 2012

Tasty Tuesday: Resurrection Rolls

My kids are ecstatic that Easter is quickly approaching. Jake has been looking forward to it ever since the excitement of Christmas wore off. He has had a countdown going since this past Sunday.  All week, when he wakes up in the morning, he first asks, "Where's baby Tyler?" and "Can I give him a hug and kiss?" Very next thing, he tells me how many days are left until we celebrate Easter. I wish I could tell you that he's looking forward to commemorating the resurrection of our Lord Jesus Christ. Or at least that he's eagerly awaiting the time spent together as a family. But no. Of course, he does understand the true meaning of Easter. He knows that Jesus died on the cross for our sins, was buried, and rose again three days later. But he's a kid. To him, it's all about the Easter basket and Easter egg hunt. What can I say, he's six.

Anyway, I wanted to make sure to put the focus on Jesus. I first heard of resurrection rolls a few years ago, but never made them. Until now.

The purpose of the rolls is to show a picture of Jesus' resurrection from the grave. (Full story and symbolization at bottom of post with recipe.) The ingredients are simple - a can of refrigerated crescent rolls, marshmallows, butter, cinnamon, and sugar. There's just one problem with that list. We don't buy refrigerated rolls. I make them from scratch. I had never made crescent rolls though. No biggie, there's a first time for everything. Sure, I could just have picked up a tube of rolls from the store, but where's the fun in that?


I love this thing. Dump all the ingredient in, select the dough/pasta setting, hit start, and wait for 90 minutes. Ah, simplicity.


Once the dough is ready, take it out, and punch it down a few times. Break it into two halves and roll each half into a 12" circle, or almost-circle. 


Cut the dough into 10-15 wedges. I made mine a little larger to cover the marshmallows. I tried a couple small ones though to see if they'd be big enough. They weren't.
If you're making regular rolls, you brush the dough with softened butter, roll them up starting with the wide end, allow to rise until doubled, and bake. We did that with one half of the batch. They other half, I let rise in wedges and then continued with the resurrection roll recipe.

Here is where I have a problem. You see, I took picture after picture of my little ones assembling the resurrection rolls and pictures of the finished product. But we can't find them. I looked on the memory card. No files found. I looked on another card. No files found. I had Leighton check. No files found. What's a girl to do? Continue with the post . . . without any picture proof. 

So, visualize with me. Can you see Jake dip his marshmallow into the melted butter? He's rolling it around . . . and around and around. There's Alyssa coating her marshmallow in the cinnamon and sugar mixture . . . and sneaking a few tastes. There's Zac pretending to help, but really just licking his fingers every 3 seconds. They all place the covered marshmallows on the crescents and wrap them up.   

And here's where we run into trouble. Again. I could skip this part - you'd never know - but I can't. See, my dough was not doubled after an hour and a half and it was getting late. I warmed the oven to 250°F for 5 minutes, placed the dough inside, and let it finish rising. I realized after we tried to cover the marshmallows and the dough wouldn't stick closed that it was partially cooked. I never turn the oven off! It was cooking my precious dough for 10-15 minutes instead of allowing it to rise in the warmth. On a side note, I boiled 2 dozen eggs yesterday to dye this week for Easter. As I was drying them to put them in the fridge, I realized that I had used brown eggs. Kinda hard to color brown eggs! Yesterday just wasn't my day in the kitchen. Hey, it happens!

Anyway, back to the rolls. We wrapped them the best we could and baked them. And we ran into trouble. Yet  again! The rolls were browning, but the marshmallows were still there. Jesus can't still be in the grave! I let them bake until the cook in me could stand it no more. We simply couldn't eat overcooked rolls just for the sake of illustration. I removed the rolls with marshmallow oozing out. We did have a couple that were totally empty inside, like they're supposed to be. The kids were amazed that the marshmallows were gone! And they loved the almost-cinnamon rolls that were left. But honestly, the ones with the fresh, roasted marshmallow-melt tasted even better! 

While they enjoyed their rolls, I read them John 19:40-20:18. We talked in depth again about the story. Jake asked, "How many times did Jesus rise? Because it says He rose . . . again. Again means more than one time."


And again we have trouble - our rolls are all gone! We should probably make them a second time just so you can see the process through pictures. Or maybe I just want more than 1 measly roll!


Ingredients:
1 (10 ounce) can refrigerated crescent rolls                       1-2 tablespoons ground cinnamon
8 large marshmallows                                                         2 tablespoons white sugar
1/4 cup melted butter

Directions:
1. Take a triangle from the cresent rolls.
The crescent roll represents the cloth that Jesus was wrapped in.

2. Get a marshmallow.
This represents Jesus and His purity.

3. Dip the marshmallow in melted butter.
This represents the oils of embalming.

4. Roll the buttered marshmallow in the cinnamon and sugar.
These represent the spices used to anoint the body of Jesus.

5. Wrap the coated marshmallow tightly in the crescent roll (bring the sides up and seal the marshmallow inside, otherwise the marshmallow will leak out.)
This represents the wrapping of Jesus’ body after death.

6. Place in a 375°F oven for 10 to 12 minutes.
The oven represents the tomb where they buried Jesus.

When the rolls have cooled slightly, the you can open the cloths (rolls) and discover that Jesus (marshmallow) is no longer there, HE IS RISEN! The marshmallow melts and the crescent roll is puffed up, but like the tomb - it is empty!


Crescent Rolls
Ingredients:
2 (.25 ounce) packages active dry yeast (or 4 1/2 tsp)           2 eggs
3/4 cup warm water (110° F)                                                  1/2 cup shortening
1/2 cup white sugar                                                                 4 cups all-purpose flour
1 teaspoon salt                                                                        1/4 cup butter, softened

Directions:
1. Place the first 7 ingredients in pan of bread maker in order of manufacture's directions. Select the dough cycle.
2. When cycle is finished, remove and punch down dough. Divide in half. Roll each half into a 12-inch circle. Spread with butter. Cut into 10 to 15 wedge. Roll up the wedges starting with the wide end. Place rolls with point under on a greased baking sheet. Cover and let rise until double (about 1 hour).
3. Bake at 400° F for 12-15 minute or until golden brown. Brush tops with butter.
Recipe adapted from here.
Pin It

Tuesday, April 3, 2012

Make It Monday: Marshmallow Easter Eggs

This is a very, very easy project for Easter. But don't let its simplicity fool you. It actually sneaks a little bit of learning into craft time!

All you need is a paper cut-out of an egg and colored marshmallows.


Just hand your kids the 2 supplies and let their imaginations do the rest.


They might make stripes, polka-dots, trees, flowers or a smiley face complete with eyebrows and mustache!

Or . . .


They might just plop all the marshmallows onto the egg.  Hey, whatever works!

I took advantage of this time to work on colors with my 2 year old. He's known all his colors for many months, but he still likes going over them. I would say "find a green marshmallow" or "can you put a pink one on the egg?" It was good review.


You can even practice patterns - easy ones for the younger kids and harder ones for the older.

But the best part???


Cleaning up!

Zac ate all of his marshmallows long before the other 2 kids were finished creating and recreating their Easter eggs. He kept reaching across the table to grab some out of Alyssa's bowl.


Little Stinker!


Grab some paper eggs and marshmallows and have fun decorating your own Easter eggs! 


Just make sure you have plenty of marshmallows to go around!


Pin It

Wednesday, December 14, 2011

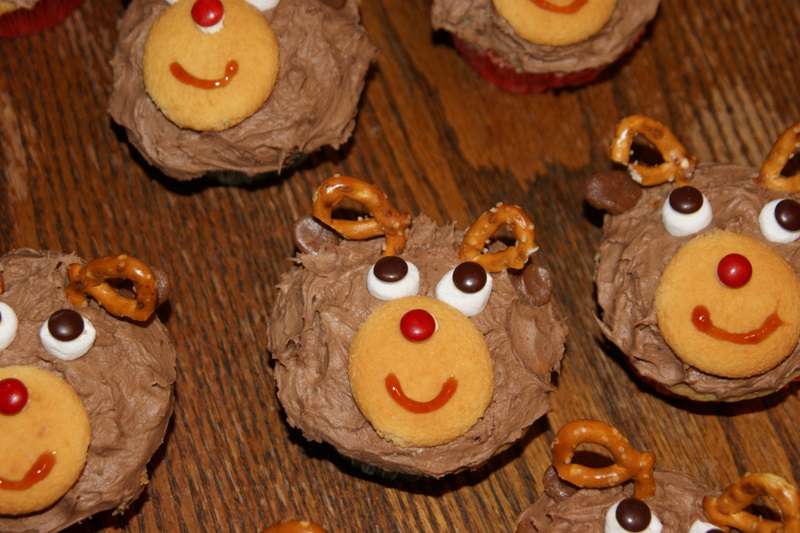
Tasty Tuesday: Reindeer Cupcakes

'Tis the season for baking and sharing! With all the Christmas parties and get-togethers happening, why not bring along a herd of adorable reindeer cupcakes? They're sure to produce many smiles and sporadic tunes of "Rudolph the Red-Nosed Reindeer."


See what I mean? They're just too cute! Jake and Alyssa were so excited to share them with their friends at church for their Christmas party.  Kids love cupcakes, (Who am I kidding? Adults love cupcakes!) but start adding things like cookies and candy, and the attraction grows. 

So, what are we waiting for? Let's make some cupcakes!


The first step is pretty simple - make your cupcakes.  Following me so far? Good.

Usually, this is where I'd grab a box of cake mix and hand it and all the ingredients to Jake and Alyssa and say, "Have at it," since a mix is perfectly fine, in my opinion, for cupcakes for elementary kids. Problem was, we are out of mixes.  From scratch cupcakes it was.


While the cupcakes are baking and cooling, you can begin preparations for decorating. These are the embellishments we used, but feel free to be creative and change it up.


The assembling of the cupcakes is challenging with a 3 year old and a 6 year old.  They wanted to go, go, go! They did not seem to realize that I am only 1 person. Crazy, I know, but it's true. There is indeed only one of me. I would frost a cupcake and hand it to a child to put on the whites of the eyes and the muzzle, all while the other child is frantically bouncing around in the chair, and I begin to frost another cupcake.


We eventually did get a pretty smooth assembly line going. There were things I did not let them do, like add the ears, antlers, and mouths. I finished up those details after I shooed the kids away from the table. Zac woke up from his nap about halfway through the decorating. His presence at the table added another element to the process.


Here's the breakdown -
  • fur = chocolate frosting, tapped with spatula to add texture
  • ears = pieces of Tootsie Rolls (warm in the microwave for 5-10 second. Pull unto pea-sized pieces, roll into balls, and flatten into ears
  • antlers = mini-twist pretzels, cut in half
  • whites of eyes = mini-marshmallows, cut in half
  • brown eyes = mini-M&Ms, glued with dab of frosting (used my decorator)
  • muzzle= Nilla Wafer
  • red nose= mini-M&M, glued with dab of frosting (used my decorator)
  • mouth = brown decorating gel


Hello, little cutie! I hope your short-lived life was a pleasant one!


Make these fun cupcakes for your next get-together and make some kids (or adults!) happy. Don't forget to come back and let us know how they turned out!


Yellow Cake
Ingredients:
2 1/4 cups all purpose flour                             1 1/3 cups sugar
3 teaspoons baking powder                             1 cup milk
1/2 teaspoon salt                                              2 eggs
1/4 cup unsalted butter                                    1 teaspoon vanilla extract
1/4 cup vegetable shortening

Directions:
1. Preheat oven to 350°F. Butter and lightly flour 2 round cake pans or 1 bread loaf pan.
2. In a medium bowl, whisk together flour, baking powder and salt.  Set aside
3. In a large mixing bowl, beat butter, shortening, and sugar until light and fluffy. Stir in vanilla.
4. Alternate adding flour mixture and milk, beating well.
5. Bake 30-35 minutes for round pans or about 45 minutes for loaf pan. Let cool for 5 minutes before transferring to wire racks to cool completely.


Linked to Watcha Making Wednesday.
Pin It

Tuesday, August 30, 2011

Tasty Tuesday: S'mores Brownie Bars

The summer is drawing to an end. The days are getting shorter, the temperatures cooler. What better way to savor these last few days than with s'more brownies? These brownies are the very essence of our favorite campfire treat - the crunch of the graham cracker, the richness of the chocolate, and gooeyness of the roasted marshmallow.


And if you just can't bring yourself to make these (because trust me, you'll want to eat the whole batch and know you shouldn't since you don't want to look like a marshmallow), know that today is National Toasted Marshmallow Day. And that, my friends, makes it totally worth it. 

Ingredients:
    3 cups graham cracker crumbs                     1 batch of brownie batter
    ¼ cup granulated sugar                                 1 bag mini marshmallows  
    ¼ teaspoon salt                                             Additional graham crackers, broken into pieces
    ¾ cup unsalted butter, melted
Directions:
   1. Preheat oven to 350 degrees F. Line the pan with foil, leaving some overhang, and then butter the foil; set aside.
   2. Combine the graham cracker crumbs, sugar and salt, mixing well. Add the melted butter and, using a fork, toss until the entire mixture is moist. Dump the graham cracker mixture into the prepared baking pan, pressing it into an even layer. Bake for about 15 minutes, or until golden brown.
   3. Meanwhile, prepare your brownie recipe. Pour the brownie batter over the cooked graham cracker crust, spreading it into an even layer. Bake the brownies according to the directions.
   4. As soon as the brownies come out of the oven, switch the oven to broil. Pour the bag of mini marshmallows onto the brownies, covering it in an even layer. Pop the pan back in the oven for a few minutes. Keep a close eye on them – you want them to start to char so you get that s’mores flavor, but don’t want to completely burn them.
   5. As soon as the pan comes out of the oven, top the marshmallow layer with the pieces of graham cracker, pressing down slightly so that the pieces of graham cracker get nestled into the marshmallow.
   6. Cool completely and then cut into squares. Store at room temperature in an airtight container.


We made the crust entirely in the food processor in just minutes. (Have I even mentioned recently how much I love that thing?) Then, we used a box mix for the brownies (dark fudge with chocolate chunks, to be exact.)

Alyssa licked every last bit of the brownie bowl, while Jacob . . . 


enjoyed the buttery graham cracker crumbs.

The real fun was trying to keep the kids from eating the marshmallows before we tossed them on top to broil. As it turned out, we used only half the bag. Guess I could have let them sugar up after all. Hindsight is always 20/20.


And this is what they look like if you can bring yourself to take a picture before slicing and devouring. (We were able to use self-control only because the marshmallows stuck to the sides of the foil. Of course, we couldn't let it go to waste. We just had to eat it!)  

Broiling the marshmallows really is what puts this recipe over the top. That charred flavor is what elevates melted marshmallow to toasted marshmallow.


But let me tell you, these babies are messy. Ooey-gooey-messy. Crumbly-falling apart-messy. Making a mess on your counter and floors . . . and children's faces messy. But they are oh-so-good! The only thing I would change is cutting down on the graham cracker crust. It's so over-powering that you almost lose the flavor of the rich chocolate brownie. Next time, I'll try 1 1/2 - 2 cups of the cracker crumbs, but leave the butter about the same in order to hold it all together better. 

Regardless, none of that stopped us from eating. And eating. And eating.


So, before the coolness of autumn and the crispness of ripe apples creep upon us, take advantage of the last few days of summer . . . and make these brownies.
Pin It

Tuesday, March 29, 2011

Snack Mix

We took the kids to the U of M Exhibit Museum of Natual History on Saturday. (Leighton wrote about it here.) The night before, we threw together some snack mix for our trip. They liked it so much, we made another batch yesterday. The fun part is using whatever you have on hand. Ours consists of colored goldfish, letter pretzels, Golden Grahams, mini marshmallows, milk chocolate chips, butterscotch chips, honey roasted peanuts, and craisins. It's so colorful, fun, and tasty! It also has some good not-quite-as-bad-for-you ingredients too. The kids take the time to enjoy the snack because of all the different options. Alyssa's favorite is the peanuts and least favorite is the Golden Grahams. Jake is the complete opposite. They trade making it a win-win. Zac, of course, eats it all.

Pin It