Showing posts with label peanut butter. Show all posts

Thursday, June 29, 2017

Peanut Butter Cup Granola


We have been obsessed with homemade granola ever since making this version in the crock pot years ago. I've since switched my method to cooking in the oven, and it is just as delicious.

With a family of 7, you can imagine that granola doesn't last long (actually, nothing lasts long with a family of 7, ha), so I like to make a lot at one time. I usually make 3 types. While one is in the oven, I prepare another. This way, I'm reusing the dishes without having to wash everything, and since most of the ingredients are the same, I have those out already too. It saves me time and streamlines the process. In less than 2 hours, we can have a ton of granola and a clean kitchen. The most difficult thing is trying to decide which kind to make!


It's no secret that we love the combination of peanut butter and chocolate. I mean, homemade Butterfingers made with a crazy ingredient, a decadent peanut butter brownie torte, rich and creamy peanut butter pie, these peanut butter bars which is one of our absolute favorite desserts, homemade Girl Scout peanut butter patties, and a cool and creamy peanut butter cup ice cream cake, anyone? All delicious, yes, but did you notice a theme? They're all desserts. And while I could totally enjoy a peanut butter bar any time of the day, it's probably not the best idea. This granola though is completely acceptable as a breakfast food! Sure, it has a bit of chocolate and chips, but it's still better than those sugary cereals, and it keeps you full longer. Sounds like a good compromise to me. Besides, the kids always think I'm making no bake cookies when this granola is cooking, because it smells exactly the same. So, it's still kinda like eating cookies for breakfast, ha.

I have been working to perfect this recipe for a while. Each time I'd make it, I'd tweak it to make it just a little bit better until we got to this. It is bursting with peanut butter flavor with a hint of chocolate. Of course, with any granola recipe, it's easy to change it to meet your tastes. Leave out the cocoa powder for a pure peanut butter version or don't add the chips for a more subtle peanut butter flavor. I use Reese's brand of baking chips to give it more of a true peanut butter cup flavor, but any brand will work.
 
Of all the granolas we make, this is the kids' favorite. I hope you like it as much as we do.


Peanut Butter Cup Granola
Ingredients:
5 cups old-fashioned oats
1 cup peanut butter
3/4 cup honey
1/4 cocoa powder
1 teaspoon vanilla extract
1 cup peanut butter chips

Directions:
1. Place oats in a large bowl.
2. In a glass measuring cup or small bowl, combine the honey and peanut butter. Microwave for one minute; whisk. Microwave an additional 30 seconds, or as needed, to melt everything and allow it to combine smoothly. (Can also be melted on the stove in a small saucepan.)
3. Stir in cocoa powder and vanilla. Pour over oats and mix to coat. (I use a spatula.)
4. Spread granola in an even layer on a rimmed baking sheet. Bake at 275°for 20 minutes. Stir and bake for an additional 10 minutes. Let cool completely before mixing in peanut butter chips. Store in an air-right container.

Pin It

Tuesday, April 12, 2016

Peanut Butter Cup Ice Cream Cake


Having kids with birthdays just 3 days apart means that we eat a lot of cake during the third week of March. Each child gets to pick the kind of cake he wants for his actual birthday and then they have to decide together on a cake for their combined party with our extended family. 

This year, Tyler was insistent on having an ice cream cake for the party. Ice cream, yes! This would mellow our abundance-of-cake week. I discussed some flavor options with him and Alyssa. I said something about peanut butter cups and ice cream sandwiches, and it was settled. No other combinations could sway their decision. And who could blame them? Chocolate & peanut butter is one of the best flavor combos ever. We have plenty of recipes featuring the two already (like these homemade Butterfingers made with a crazy ingredient, this decadent peanut butter brownie torte, this rich and creamy peanut butter pie, these peanut butter bars which is one of our absolute favorite desserts, these homemade Girl Scout peanut butter patties, and the ever-faithful no-bake cookies), but you can never have too many chocolate-peanut-butter desserts. Am I right?


The ice cream cake was a hit at the party. In fact, the entire thing was eaten that night. That can be both a good thing and a bad thing. I mean, you always want to serve something that people enjoy, but it also means that there were no leftovers to enjoy later! 

Alyssa had chosen a rich, mint chocolate chip cake (which is another favorite of mine!) for her birthday day, but, I admit, I was pleased when Tyler said he wanted the ice cream cake again on his birthday. Yes, more cool peanut buttery goodness. I've trained them well, you know, refined their palates and stuff.


In addition to being delicious, this cake is incredibly easy to make. The hardest part is assembling it before the ice cream melts. Chopping the peanut butter cups in the beginning and keeping the ice cream sandwiches in the freezer until needed (pulling out only 6 at a time) helps to keep your dessert in cake form, instead of a drippy, soupy blob.

To make this recipe even easier, you could use Cool Whip instead of making the whipped cream yourself. I, personally, love using fresh, whipped cream. It takes only a few minutes to make, yet the difference is amazing. Place a dollop on pancakes, garnish hot chocolate, ice a cake--it makes treats extra special.


I hope you enjoy this ice cream cake as much as we do! I'm already ready for another slice.


Peanut Butter Cup Ice Cream Cake
Ingredients:
18 ice cream sandwiches
1 cup creamy peanut butter
12 Reese's Peanut Butter Cups, chopped
Chocolate sauce
Fresh, whipped cream (or 1-2 small tubs of Cool Whip)


Directions:
1. Heat peanut butter in the microwave for 30 seconds. Stir.
2. Working quickly, place 6 unwrapped ice cream sandwiches on a serving platter. Spread half of the peanut butter on top. Sprinkle with 4 chopped peanut butter cups. Drizzle with chocolate sauce.
3. Arrange 6 more unwrapped ice cream sandwiches on top and repeat layer of peanut butter, peanut butter cups, and chocolate sauce. Place remaining 6 ice cream sandwiches on top.
4. Cover cake with whipped cream. Garnish with peanut butter cups and chocolate sauce. Freeze cake for at least 30 minutes, and until ready to serve. Keep leftover cake frozen.


Whipped Cream
Ingredients:
1 pint (2 cups) heavy whipping cream
1/4 cup sugar
1 teaspoon vanilla extract

Directions:
1. Place metal mixing bowl and metal whisk attachment in the freezer for 10 minutes.
2. Place all ingredients in the bowl and beat until stiff peaks forms. Do not over-beat.

Pin It

Wednesday, May 9, 2012

Tasty Tuesday: Butterfingers

What do you buy people who have everything? Or, when there is actually something they want, they just go out and buy it themselves.

That is the dilemma we experience with my parents. They are the hardest people to buy for. Oh, it's not that they're ungrateful. Far from it. They are the most giving people. Ever. And they want nothing in return.

My dad recently celebrated a birthday. And as always, we asked, "What are going to get him???" There's always the Barnes & Noble gift card option. He does a lot of reading. A lot of reading. People often give him gift cards so we wanted to pick something different this time. Another gift we often fall back on is dress shirts. Between work (he's a chiropractor) and church, my dad wears a lot of dress shirts. My mom suggested we go this route. But a couple of dress shirts (they have to be Staffords from Penney's) just seemed so boring . . . and typical. 


Then I thought of Butterfingers. They are his favorite candy. In fact, it's really the only candy he ever eats. There is always a bag of fun size bars in the freezer. Somehow, they taste even better frozen. Instead of just picking up a bag from the store, I thought, "Hmm, I bet there's a recipe to make them myself." And you know what? There is! So that's just what we did.

I looked at the recipe in 4 different places. And while the ingredients were always the same, I found 4 different variations for the ratio of them. After comparing and brainstorming, I settled on my own ratio.


The first ingredient is probably not what you would expect.

Candy corn.

Candy corn?

Yep. Candy corn.

Wait, do they sell candy corn in the spring???

Surprisingly, I found 3 containers full of candy corn in the bulk section of Meijer. Three whole containers 6 months after Halloween! Either these candies are really stale or the store keeps them stocked year-round.

I'm hoping it's the latter.


 Melt them down and admire the pretty colors.


Add some peanut butter.

Peanut butter and candy corn???

Just trust me.


Mix it all together and admire the pretty colors again.


Plop the mixture into a pan lined with wax paper and let cool.


If you're totally intrigue to find out if candy corn and peanut butter really taste like a Butterfinger and you can't wait for it to cool, go ahead and scrap some off the spoon. I give you permission.


Cut up your bars. A real Butterfinger is about 2 inches long and 1 inch wide, but with sloped ends.

Yes, I measured.

Yes, I'm compulsive like that.


Melt your chocolate.

I prefer candy melts because they melt and coat better than chips, but I didn't have any.

But I always have chocolate chips! I melted the chips in a makeshift double boiler (pan with a couple inches of water with a metal bowl resting in it.) I also added about a tablespoon of vegetable oil to thin the chocolate and make it easier to coat. 


Coat your bars with the chocolate.

If you have any leftover chocolate, put it in a small dish and hand it and some mini marshmallows to your kids. They'll think you're the coolest mom.


Finally, time for a comparison!

Pretty similar in size.

Comparable in shape.

A couple shades off in color.


Almost double the thickness. (I changed the pan size in my directions.)

Filling color is spot on.

Texture is crunchy, yet chewy.

Taste?

Taste???

Taste is nearly identical! Oh, it's crazy. The chocolate is a tad too rich (just like when we made the mock Girl Scout peanut butter patties), but the filling tastes like the real thing. It's no wonder the kids love them. Jake even asked if we could make them every week. Yeah, they're good. Crispy, crunchy, peanut-buttery!


A couple of boring dress shirts and yummy homemade Butterfingers - happy birthday, Dad!


Butterfingers
Ingredients:
2 cups candy corn
1 1/2 cups peanut butter
1 1/2 cups milk chocolate chips or candy melts

Directions:
1. Melt candy corn in microwave for 1 minute. Stir. Continue to heat for 15 second intervals, stirring each time, until completely melted.
2. Add peanut butter and mix until combined.
3. Pour mixture into an 9x13 inch pan lined with wax paper. Let cool for 1 hour.
4. Cut into bars
5. Melt chocolate in double boiler or microwave. Coat bars with chocolate and place on a parchment lined cookie sheet to set.

Pin It

Tuesday, April 10, 2012

Tasty Tuesday: Peanut Butter Brownie Torte

I had been wanting to make this dessert for months, just thinking about it and drooling over it. Why didn't I make it sooner? I knew this was a recipe that needed to be shared. Peanut butter and chocolate together is my weakness. Add brownies to the mix, and I have no self-control. I knew I'd end up eating the majority of this decadent torte if it were made for just us. When my nephew was home from college a few weeks ago, and the family was getting together, I instantly knew what I'd be bringing.


The original recipe makes two small tortes using 4½ inch spring form pans. I don't even have one pan that small, let alone the six needed. What I did have was three 9 inch pans. I figured I could make one torte with the larger pans instead of two with the smaller. I mean, 4½ times 2 equal 9, right? Everything would be fine, right? 

Wrong. 

The brownie layers were incredibly thin. Very tasty, sure, but so flimsy that they wouldn't hold up to the peanut butter mousse in between the layers. It was just an hour before everyone would show up at my parents' house where I was baking. The prime rib was cooking away in the roaster, the potatoes were ready to be placed in the oven, the rolls were rising on the counter . . . and the brownie layers were crumbling into pieces. 


It was at this point that I asked, "Why did I choose a recipe that I had to completely adapted for the first time for company???"

I ended up starting over - this time doubling the brownie layers. I was working frantically - leaving the used ingredients scattered around, sprinkling trails of powder across the counter, and splattering batter all over the kitchen - trying to get them in the oven before the temp needed to be changed for the potatoes.

There was one thing though that made it all ok. One aspect that made my frenzied endeavor bearable - eating the discarded brownies. Oh. My. Goodness. They were so fudgy and chocolatey. And addicting. I enjoyed entirely too many bites. Definitely a good sign for the finished product.

I finished assembling the torte after dinner. I learned something that day: it's not a good idea to take food pictures when you have a group of people waiting to eat the subject. I don't know how many times I heard "Are you done yet?"


Let me tell you, this dessert is rich - and I like rich. But this is rich. One sliver of a piece is all you really need. Unless you chill the torte first. Wow. The next day, after sitting in the fridge, this was amazing! I walked into the kitchen and found Zac sitting at the table with the entire plate just eating away. I know, that boy eats everything, but even Jake, who is not into chocolate, could not stop gobbling this up. It's that good. The only thing I would change is to leave off the chocolate ganache. It really is too much, in my opinion. But that mousse? I could eat that with a spoon!    

Please,  if you like peanut butter, chocolate, brownies, and all things delicious, make this torte!

But don't play around with the recipe when you're pressed for time. Unless you want to snack on the extra brownies.


Peanut Butter Brownie Torte
3 brownie rounds (recipe follows)
peanut butter cream cheese mousse (recipe follows)
peanut butter cup pieces (I used 1 king size bag of Reese's PB Cup Minis)
chocolate ganache (recipe follows)

Brownie Rounds
Ingredients:
1⅓ cups unsalted butter, melted                                       ½ cup cocoa powder
2 cups granulated sugar                                                   1 cup all-purpose flour
2 eggs                                                                            ½ tsp baking powder
2 egg yolks                                                                     pinch of salt
1 tsp vanilla extract                                                          1 cup semi-sweet chocolate chips

Directions:
1. Preheat oven to 325F. Butter and flour three 9-inch diameter spring form pans. Set aside.
2. Using a stand mixer with the paddle attachment, mix together butter and sugar, about 2 minutes. Add in egg, egg yolk, and vanilla. Beat another minute. Pour in cocoa, flour, baking powder and salt. Mix on low speed until fully incorporated.
3. Fold in chocolate chips until completely distributed throughout the brownie batter.
4. Evenly distribute the batter into the three prepared pans. Bake for 20-23 minutes. Remove from oven and let cool.

Peanut Butter Cream Cheese Mousse
Ingredients:
½ cup whipping cream, chilled                                        ⅓ cup + 2 tbsp powdered sugar
5 ounces cream cheese, at room temperature               ⅓ cup peanut butter

Directions:
1. Using a stand mixer with the whisk attachment, whisk the whipped cream on high until stiff peaks form. Place into a bowl and set aside.
2. Add the cream cheese and peanut butter into the mixer and whisk on medium speed, until fully incorporated. Add powdered sugar and mix until combined.
3. Add whipped cream back into bowl and whisk on medium high until peanut butter mixture and whipped cream are fully incorporated and the texture is light and fluffy.
4. Place into a medium sized bowl and set in fridge while brownies fully cool, at least 30 minutes.

Chocolate Ganache
Ingredients:
4 ½ ounces semi-sweet chocolate, chopped finely
½ cup heavy whipping cream

Directions:
1. Place chocolate in a medium bowl.
2. In a small saucepan bring cream to a boil. Once the boil starts, pour over chocolate. Let sit 5 minutes. 
3. Whisk until mixture is smooth and glossy.

To Assemble the Torte
1. Remove brownie from spring form pans. Place one brownie circle on a plate. Add 1/3 of the  peanut butter mousse. Scatter a handful of peanut butter cups on top. 
2. Place another brownie round on top of the that. Then add another 1/3 of the peanut butter mousse. Then add more peanut butter cups.
3. Place third brownie round on top of second layer. Add remaining peanut butter mousse and more peanut butter cups.
4. Pour the ganache over the top of the torte. Best if chilled.
Recipe adapted from Peabody.
Pin It

Wednesday, January 25, 2012

Tasty Tuesday: Peanut Butter Cookies with Reese's Pieces

January 24 is National Peanut Butter Day! Did you know there was such a day??? Oh, the wonderful things you learn while homeschooling!  It worked out well that it fell on a Tuesday this year. Of course, that meant that we had to make something using peanut butter. (Trust me, there were no complaints here!) I looked through the archives and to see which pb recipes we've already made. There's mock Girl Scout peanut butter patties (which would be very close to the originals with a little modification), a divine peanut butter cream pie (which is so creamy and peanut buttery, and so delicious), peanut butter bars (which is our all-time favorite dessert), and even something for our outdoor friends.

What I did not find was peanut butter cookies. Sure, we have no bake cookies, that have pb in them, but no traditional peanut butter cookies, where the peanut butter itself is the star.

Don't worry, we remedied the situation.

Start with 2 kinds of sugar, 2 kinds of peanut butter, and butter (you could use 2 kinds if you really want to.)


 Beat it up. It's so much fun, you know.


Add in some eggs. This is still Jake's favorite part. Unfortunately for him, he has to share the experience with his sister. Alyssa has gotten pretty good at cracking eggs, too.


Beat it up again.

Stop to take a taste . . . or two.

Then attempt to stop the kids from eating the whole bowl full.


We had the inconvenience, I mean, joy of having Zac help us this time. He decided that he needed only a 20-minute nap. Making cookies sounded like much more fun than sleeping. 

I was reminded of 2 things:
1) Toddlers are messy. We ended up with a floury mess on the counter, on the floor, all over Alyssa. Some flour did accidentally make it into the bowl.

2) My kitchen is small. Between 3 children and all the ingredients and utensils, there was no room left to maneuver. Every year I ask Leighton for a bigger kitchen for Christmas. I have yet to find one wrapped up under our tree.


Add the dry ingredients to the bowl.

Thankfully, it was not Zac's turn to add the next ingredient. I shudder at the thought of the entire bowl being spilled everywhere.


Then comes the very best part - adding the Reese's Pieces. Just try and add them without sneaking a few tastes. I dare you.  


I admit, I shooed the kids out of the kitchen while I rolled the balls. I knew exactly what would happen if I let my 3 little angels handle the dough - more would end up in their mouths than on the cookie sheets. Zac was upset enough when I put the dough in the fridge. "Hey! Where'd tookies go?" He was ready to make a meal of the unbaked dough.


Use the tines of a fork to make a criss-cross pattern on each cookie. Unlike other cookies, peanut butter ones tend to hold their shape pretty well. In order to not have little ball cookies, you'll need to press down just a bit. 


And this is how they'll look when they're done. They look pretty good, don't they? Let me tell you, they taste even better! The edges are a little crispy with a soft, chewy center. Exactly how I like my cookies. (If you want soft edges, bake a little less.) The combination of the crunchy and creamy peanut butter is perfect since it makes a nice balance, and the nuts are not over-powering. And of course, the addition of the Reese's Pieces is a must! That extra burst of peanut butter really makes these cookies stand out. Eat them with a glass of milk, and you'll be set. You might even want to hide the rest because they'll get eaten pretty quickly!


Don't wait until next National Peanut Butter Day to try these. Make them today! 


Peanut Butter Cookies with Reese's Pieces
Ingredients:
1 c butter                                                                             2 3/4 c all-purpose flour
2 c peanut butter (I used 1 c crunchy, 1 c creamy)             1 tsp baking powder
3/4 c white sugar                                                                1/2 tsp salt
1 c packed brown sugar                                                      1 1/2 tsp baking soda 
1 tsp vanilla                                                                        1 c Reese's Pieces
2 eggs

Directions:
1. Cream together butter, peanut butter and sugars. Beat in eggs and vanilla.
2. In a separate bowl, sift together flour, baking powder, baking soda, and salt. Stir into batter. Stir in Reese's Pieces. Put batter in refrigerator for 1 hour.
3. Roll into 1 1/2 inch balls and put on cookie sheets. Flatten each ball slightly with a fork, making a criss-cross pattern. Bake in a preheated 375 degrees F oven for 8-10 minutes or until cookies begin to brown. Do not over-bake. Let cool on cookie sheets for 5 minutes before transferring to cooling racks to cool completely. Cookies will stiffen as they cool.
Pin It

Wednesday, December 21, 2011

Tasty Tuesday: No Bake Cookies

It's that time of year again - time to spend an entire day baking, baking, and more baking! I love making all these goodies and sharing them. I get a few bites here and there, but am not tempted to eat every single morsel!

We were able to make 5 tins and 2 huge plates full of goodies to spread some holiday cheer. And we still have waaaayy too many left in the house. Trust me, the kids are not complaining (either is the husband, for that matter.)

This picture might remind you of the one from last year. Some of the lineup is the same, but we decided to change it up a little bit. We made spritz cookies in green Christmas trees and red ornaments, snickerdoodles, chocolate chip oatmeal cookies, no bake cookies, fudge, white chocolate & milk chocolate-covered pretzels and Oreos (both regular flavor and Very Berry), sour cream cookies, and brownies. 

This year, I decided to take a few weeks to highlight some of the recipes we made.


First up - no bake cookies! You are not going to find many cookies that are easier to make than these. And they're seriously good. They don't look very appetizing, but looks can be deceiving. 


 Dump some sugar, cocoa powder, butter, milk, and salt into a pot.


 Bring to a boil and be amazed by the bubbly goodness.


 Add peanut butter, vanilla, and oats and stir, stir, stir.


Immediately plop some of the mixture onto wax paper. The gooeyness will just slide right off while it's still warm. 

It's totally ok if some bits randomly fall. It's the perfect way to sneak a taste!


As the cookies cool, they will harden, making it possible to pick them up.

See what I mean? They're not very pretty, but who cares! The peanut butter and chocolate flavors blend into complete yumminess and the oatmeal gives it a bit of texture. Alyssa, Zac, and I love these cookies; Leighton and Jake, not as much. It's a good thing we have many other options for them to choose!

Don't forget to check back next week as we continue with our Christmas baking recipes.


No Bake Cookies
Ingredients:
2 c white sugar                                                  1 pinch salt
3 tbs unsweetened cocoa powder                    3 c quick cooking oats
1/2 c butter                                                        1/2 c peanut butter
1/2 c milk                                                           1 tsp vanilla extract

Directions
1. In a saucepan bring sugar, cocoa, margarine, milk, and salt to a rapid boil for 1 minute.
2. Add quick cooking oats, peanut butter, and vanilla; mix well.
3. Working quickly, drop by tablespoon onto waxed paper, and let cool.


Linked to Watcha Making Wednesday.
Pin It

Wednesday, September 14, 2011

Tasty Tuesday: Peanut Butter Cream Pie

I must be on a peanut butter and chocolate kick. Last week, we made these. And now we have a peanut butter pie. Maybe next week we can stray away from the super rich desserts. 

Maybe not.


Ingredients:
8 ounces chocolate cookies                                  1 cup creamy-style peanut butter
4 tablespoons butter, melted                                 1 cup confectioner's sugar
4 ounces semi-sweet chocolate chips                   1 – 14 ounce can sweetened condensed milk
1/4 cup chopped peanuts                                      1 teaspoon vanilla extract
1 cup heavy cream                                                1 teaspoon freshly squeezed lemon juice
8 ounces cream cheese

Directions:
1. Add the cookies to the bowl of a food processor and pulse into fine crumbs.  Combine melted butter and cookie crumbs in a small bowl, and stir with a fork to mix well.  Press mixture into the bottom and 1-inch up the sides of a 9-inch springform pan.

2. Melt the chocolate in a double boiler or in the microwave.  Pour over bottom of cookie crust and spread to the edges using an off-set spatula.  Sprinkle chopped peanuts over the melted chocolate. Place pan in the refrigerator while you prepare the filling.

3. Pour the heavy cream into a bowl and beat until stiff peaks form.  Store in refrigerator until ready to use.  Place the cream cheese and peanut butter in a deep bowl.  Beat on medium speed until light and fluffy.  Reduce speed to low and gradually beat in the confectioner's sugar.  Add the sweetened condensed milk, vanilla extract and lemon juice. Increase speed to medium and beat until all the ingredients are combined and filling is smooth.

4. Stir in 1/3 of the whipped cream into the filling mixture.  Fold in the remaining whipped cream.  Pour the filling into the prepared springform pan. Garnish as desired. Refrigerate for three hours or overnight before serving.

I started with chocolate sandwich cookies and scraped the cream filling out using a butter knife. Good thing I had plenty of helpers to eat all that cream! Zac was in heaven since that's all that he eats of the cookie anyway.

We then tossed the cookie halves into the food processor and had perfect crumbs in less than thirty seconds. Afterwards, we dropped in the peanuts to chop those as well.

If you'd like to spread the chocolate to the edges, like the recipes states, add some heavy cream or milk to get it to a spreadable consistency. Otherwise, you'll have glops of unspreadable chocolate that sticks to the cookie crumb crust and breaks it up as you try to spread it. The sad thing is that I knew that, but was feeling a little lazy and since the recipe didn't call for it . . . I ended up with glops of chocolate.  Honestly though, I would leave that chocolate layer right out. The pie is incredibly rich and certainly doesn't need it. And I like rich.

As soon as Zachy saw the mixer on the counter, he ran right over and stood by my side. The cream from the sandwich cookies was long forgotten. He had his eyes on the whipped cream. Sad thing was that it was unsweetened and not nearly as yummy as what he normally experiences from the beater. Not to worry, big brother was right there to finish it off.

The next few steps were all about measuring, beating, dumping, mixing, folding. Pretty self explanatory.

Then I dumped the deliciousness (and yes, of course I tried it!) into the prepared crust, topped it with some melted chocolate (with milk this time!) and placed it in the fridge overnight. 

Hours later, an innocent child opened the refrigerator to get a snack, something healthy like yogurt. Instead, his eyes fell upon the finished pie, now decorated with melted chocolate. All thoughts of yogurt were forgotten. His healthy snack was replaced with a piece of peanut butter pie. 

Can you blame him?


This pie is not meant for photographing. 

But it's certainly meant for enjoying. The kids informed me over and over again just how good it was. They also made statements of how chocolatey and peanut-buttery it was. No one finished his small piece - not even Zac!  Jake kept telling me that he was going to save the rest of his for later. Every time, just as I was putting it back in the fridge, he was right there saying, "Welllll, maybe I have a little more room in my tummy."

I was leery of the peanuts under the filling since we're not big fans of things with nuts. It needs them though. They add that little bit of crunch to an otherwise total creaminess. It's a lovely contrast.

Go ahead and join in the peanut butter and chocolate kick that we're on and make this pie!

Just make sure to have lots of loved ones nearby to help you eat it all.
Pin It

Tuesday, September 6, 2011

Tasty Tuesday: Peanut Butter Bars

This is by far our favorite dessert recipe. Ever. I have made it dozens of times for family, church, friends, work, neighbors - you name it, we've taken these there. The bars get devoured in 2.47 minutes. No lie. They are often requested and always enjoyed.

If you like Reese's Peanut Butter Cups, you will love these. They taste like the real thing - but better.

Ingredients:
1 cup butter, melted                     1 cup + 4 tablespoons peanut butter, divided
2 cups graham cracker crumbs                         1 1/2 cups semisweet chocolate chips
2 cups confectioners' sugar


Directions:
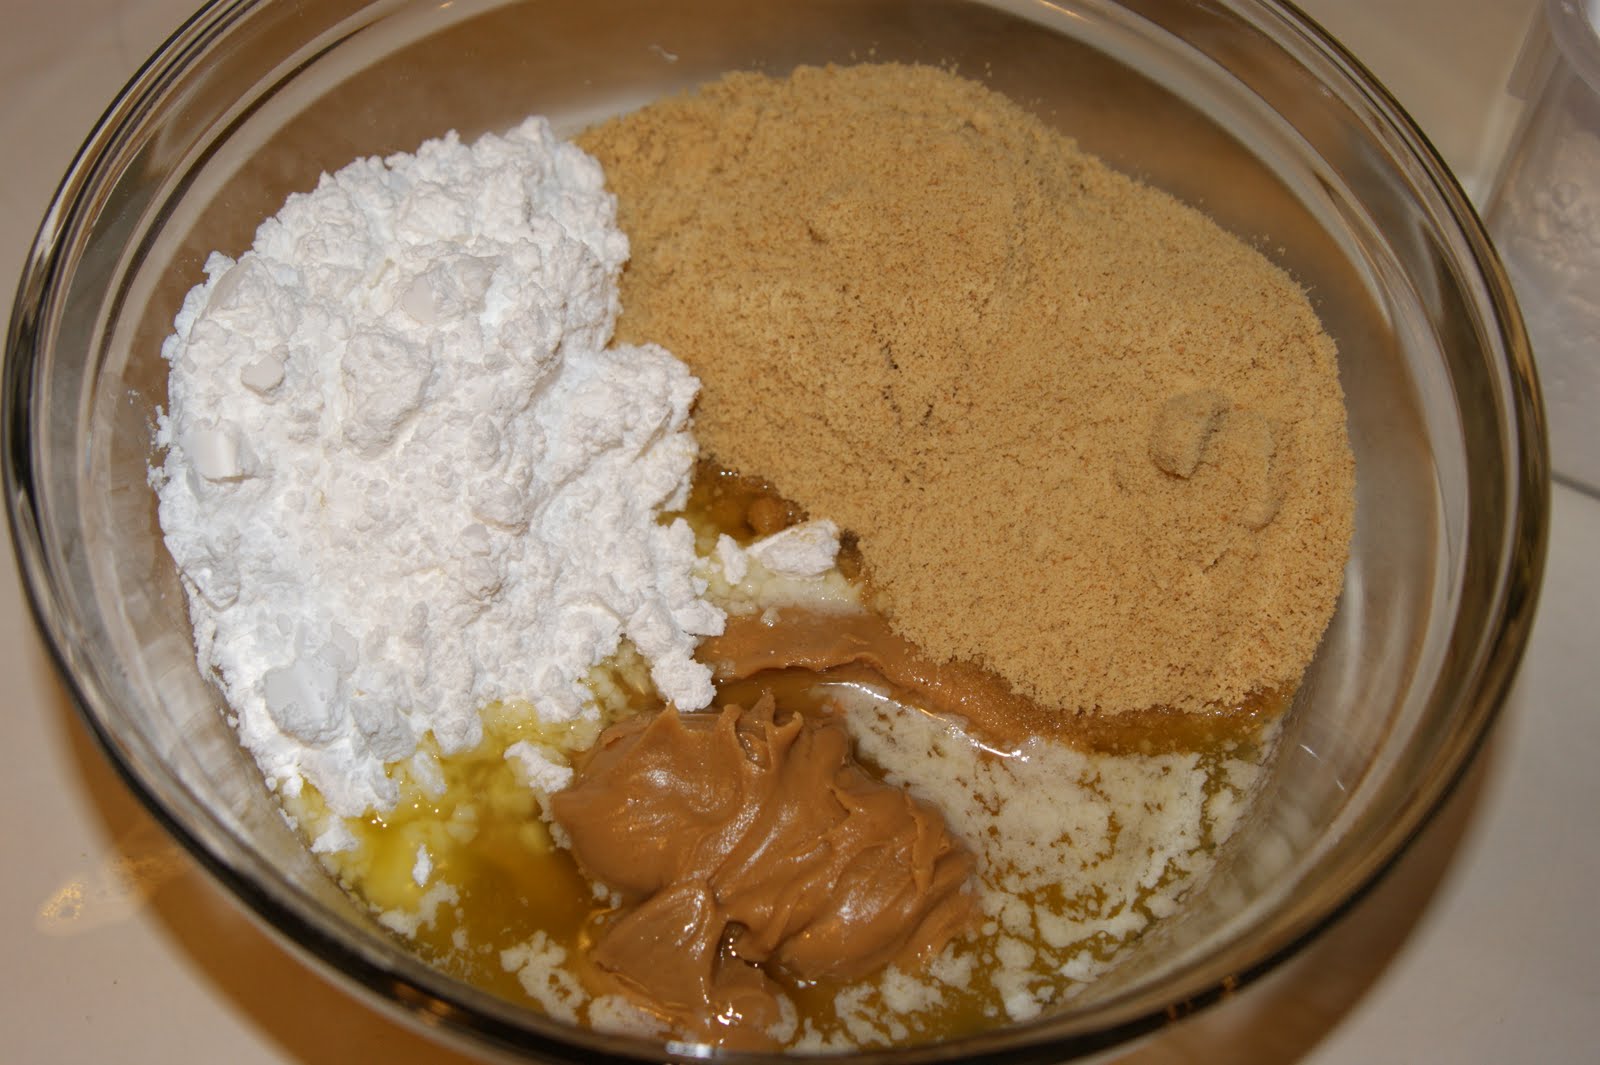
1. In a medium bowl, mix together the butter, graham cracker crumbs, confectioners' sugar, and 1 cup peanut butter until well blended. Press evenly into the bottom of an ungreased 9x13 inch pan.
2. In a metal bowl over simmering water, or in the microwave, melt the chocolate chips with the peanut butter, stirring occasionally until smooth. Spread over the prepared crust. Refrigerate for at least one hour before cutting into squares.

These 5 ingredients are all you need to become someone's hero.


 Dump the first 4 ingredients into a bowl and mix well.


Plop the mixture into a 9x13 pan and spread evenly. I have found that clean, dry fingers (preferably your own) work best for spreading. Refrigerate for 15 minutes.

Doesn't that look appetizing???


Place the chocolate chips and remaining peanut butter in a microwave-safe dish and melt at 50% power for 30 seconds. Remove and stir. Continue until all the chips have melted and you have a smooth consistency.

Such a beautiful union of flavors! Whoever was the first to combine chocolate and peanut butter was a complete genius.


Pour the topping over the bottom (clever, huh?). Gently shake the pan on the counter to smooth the chocolate.

I suggest trying not to take pictures during this step. Holding a HOT bowl and attempting to snap a pic is not an enjoyable experience. Nor does it produce a very pleasing picture.


Do not be alarmed if the first bar you cut and remove breaks into pieces. Just accept the fact that you'll have to eat it. It's just part of the job. Oh, the things we have to endure!

Don't let the simplicity of these bars fool you - these are amazing! But don't just take my word for it. Make them yourself and everyone will love you! Promise.
Pin It

Wednesday, July 20, 2011

Tasty Tuesday: Mock Girl Scout Cookies: Peanut Butter Patties


Everyone loves Girl Scout cookies, from the traditional thin mints to the sophisticated cranberries and white fudge. With a dozen varieties, there's something to satisfy every taste bud. I know. I sold over a thousand boxes during my green-uniform-wearing years.

But what do you do when you get a craving and the cookies are out of season???

You make them yourself, of course! 

Homemade Peanut Butter Patties a.k.a. Tagalongs
Ingredients:
2 sticks (1 cup) unsalted butter, room temperature               3 cups all-purpose flour
1 cup sugar                                                                            1/2 cup smooth peanut butter
1 large egg                                                                             1/2 cup confectioner’s sugar
1 teaspoon pure vanilla extract                                              2 cups semi-sweet chocolate chips 
1/2 teaspoon kosher salt

Directions:
1. In the bowl of an electric mixer, cream together butter and sugar. Beat until smooth. Add in egg and beat until well incorporated, scraping down the bowl, if necessary. Add in vanilla. Beat until smooth. With mixer on low, add in salt and flour. Mix until completely incorporated and dough is uniform. Shape dough into a cylinder with a diameter of about 2-3 inches. Wrap in parchment paper and freeze for at least 25 minutes.
2. Preheat oven to 350 degrees. Slice dough into 1/8 inch disks and place on baking sheets, about a half inch apart. Once you have made 30 cookies, wrap up the cookie dough, freeze, and save for another time. Bake for 8 minutes. Place on a cooling rack and let cool completely.
3. Mix together peanut butter and powdered sugar. Form into small disks and press onto cookies. Melt chocolate in a microwave safe bowl for 30 second intervals, and mix well after each interval. Coat cookies completely in chocolate and lift out with a fork. Place on a parchment lined baking sheet and let set, or freeze to speed up the process.

Most of the time, I let the kids help me measure the ingredients, but other times, I prepare everything before calling them into the kitchen. This time, they were playing "store" in the boys' room, and I couldn't bring myself to interrupt them. I arranged everything before we started.


The making of the cookie dough was pretty uneventful. Dump. Beat. Pour. Blend. Empty. Mix. Scrape.


Meet Jacob. This is the boy who wears jeans and long-sleeves in the heat of summer and naught but his undies in the frigidity of winter. Anyone else think this is odd???


I questioned the 2-3 inch diameter written in the directions, but promptly obeyed. By the time the cookies were done baking, they were exactly 2.5 inches. Much too big, in my opinion. The real peanut butter patties are 1.75 inches in diameter.


I started mixing the peanut butter and powdered sugar with a fork. Once it was mostly incorporated, I finished combining it with my hands.


The kids had fun playing with the edible "dough." They flattened it, rolled it, and sneaked a few tastes. Along the way, they happened to make a couple rounds for the cookies. Completely by accident, I'm sure. They were having too much fun playing to worry about finishing the cookies. That's where I took over.

Since the cookies were huuuge, I had to make more peanut butter filling. I used another 1/3 cup of each ingredient. We ended up with a tiny bit left over, which we rolled into little balls and popped them in our mouths. Didn't want it to go to waste, ya know!


Can you see how thick this chocolate is? That was even after I added 1 tablespoon of vegetable oil to thin it a bit. I almost had to frost the cookies in order to cover them with the chocolate. Then, I had to scrape off the excess. This step was very frustrating and time consuming. I suggest adding more oil to make the process easier.

Again, I had to melt more (1 cup) to have enough to cover the bigger cookies.

 
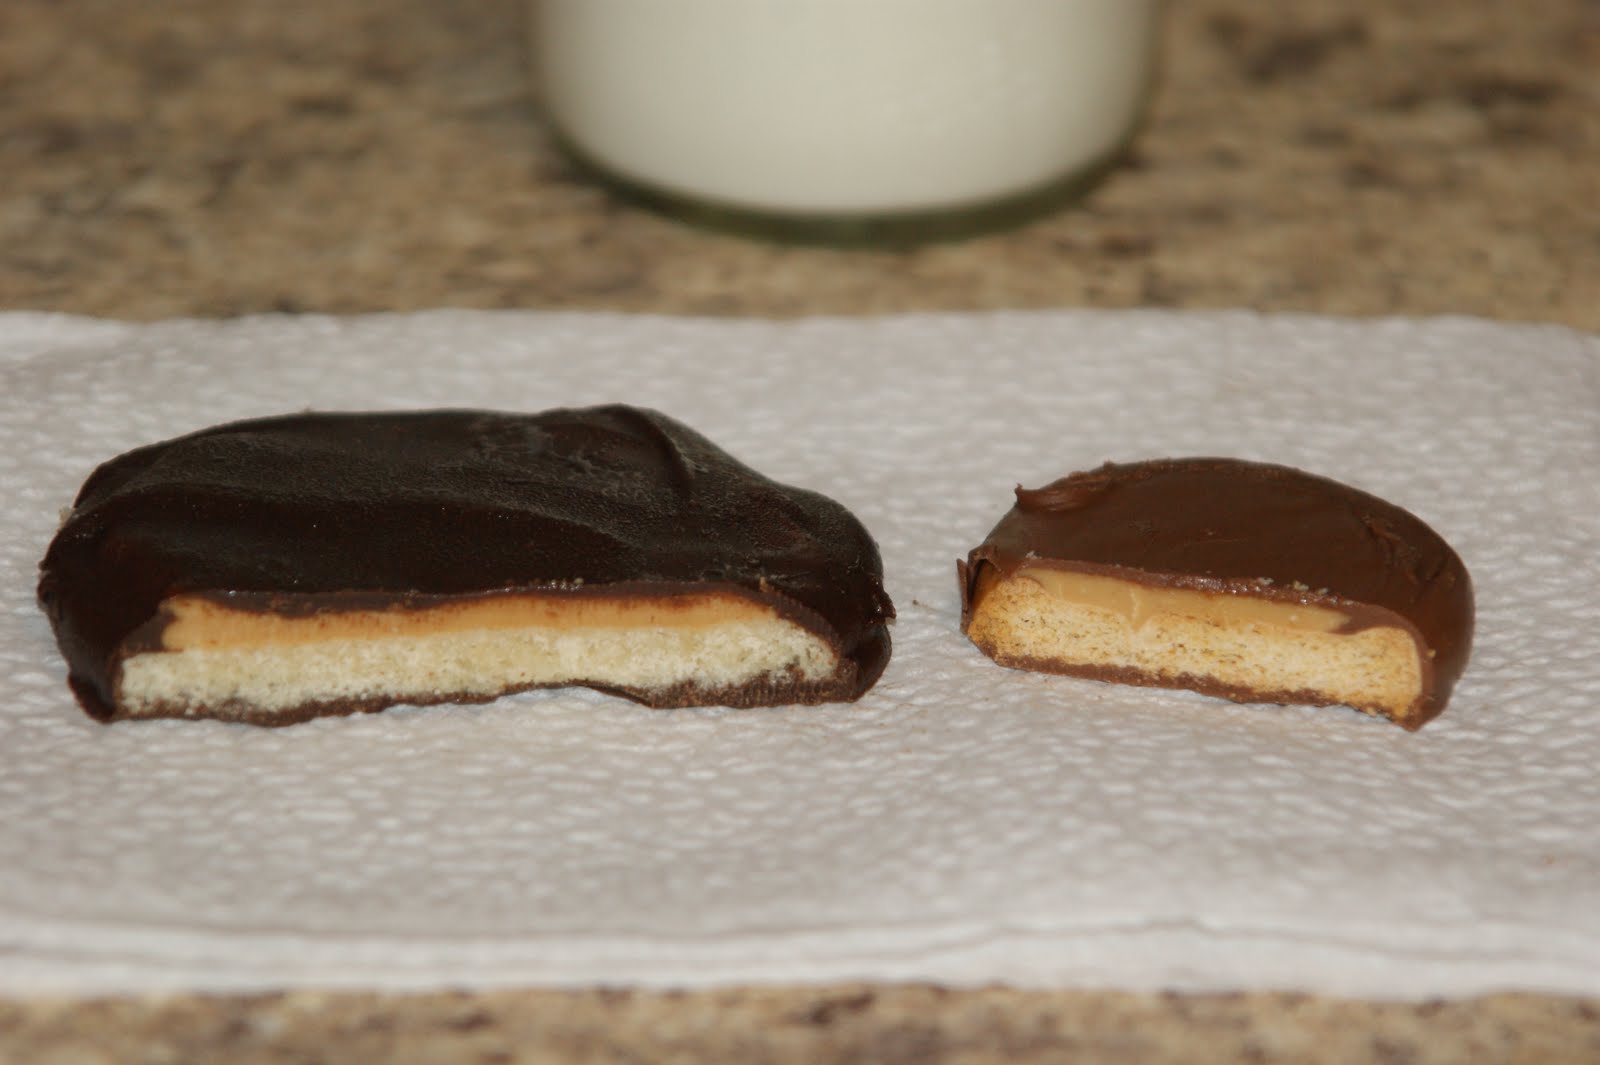
I'm sure you can see the difference between the real Girl Scout peanut butter patties and our mock cookies. Ours are big, dark, and look homemade. The packaged ones are small, light, and more uniform. Both are melting in the extreme heat.

But how do they taste???


As expected, Jake liked the Girl Scouts', Alyssa liked the mock ones, and Zac gobbled them both up.

The chocolate was the distinguishing factor. The semi-sweet chocolate was much richer than the "real" cookies. I think milk chocolate would be a better match.


Both varieties are yummy. I may try this recipe again with the above modifications.

If you get the urge to try them yourself, let me know how they turn out!

Pin It