Showing posts with label DIY. Show all posts

Thursday, January 8, 2015

Another Word of the Year: 2015

In case you didn't notice above I'll give the heads up right away. This is not Erika. I know, I know, it's irregular for me to write anything for the blog that was my idea in the first place. Let's get past that and move on, okay, I'm writing a post. Erika mentioned to me a few weeks back that she was going to do a "Word of the Year" post for 2015, and then she told me her word and I thought that was pretty cool. Then a word popped in my head that explained exactly what I need to be doing this year. I thought, 'Hmmm, maybe I need to make a word for the year.' Which didn't seem like a bad idea. Then I thought, 'Maybe I should write a post about it, too. Wait, I don't do well with post writing.' I now refer you to my, 2+ years in the making, post on our original visit to The Henry Ford. So it came down to, 'Well, the post will be a good first step in the right direction in fulfilling my word of the year.'

So, here is my first step in the right direction...

You see if you came to our house and took a good look around you'd notice a few things.

1. I like to do things myself. I have the mentality, 'Why pay someone else to do something I can do myself?' It saves me money in some places and teaches me lots in all. I enjoy creating things and am proud of the stuff I know how to do on my own.

...but you'd also notice...

2. I don't finish the things I do myself, very often. (the very often part of that statement is said very quietly because its not often at all...) I don't know. I just don't ever complete it. It's not that I don't 'want' to. It's just each project gets to a point where it is functional and I move on.

We have a number of unfinished items in our house:

Alyssa's doll house is still in two halves and the roof is 'removable' for easier second floor play, right? I didn't paint it so she could use her imagination as to what it ought to look like each time she plays with it. Good variety. (Insert sarcastic emoticon here)

Our attic ladder is still natural wood in color and has a somewhat large gap going around it for 'adequate ventilation' in the summer. Not to mention the stripped drywall paper layer from me learning the lesson about how to properly break and removed drywall. (Maybe we can discuss that another day. It's something I already knew.)

A more recent project was removing the old caulk from around the bathtub and put in new so it would look better, the last guy wasn't very tidy about it. This was supposed to be done before Nicholas was born. The old stuff is gone and a quarter of the new is in place. Then Nick was born, the day I was working on it no less....so there it sits.....uncomplete.

Then there is the cabinets. This is the big one. A few years ago, yes, years. Like multiple, more than three. We added cabinets along a bare wall in our kitchen. This gave Erika more space to hold things and a little more counter space to work on. We got the bare wood ones, you know so I could paint them. The plan was for me to paint the new as well as the old white. I researched how to do it right, what paint was best and what method was going to make it look great. I even bought a brand new HVLP paint sprayer to do the work, and then I did... nothing. Did I mention we even picked a color? Cloud White. Yeah, everything is technically in place but the work.

So, here I am now with a ton of unfinished projects, more than the four I've mentioned, and a word popped into my head...

FINISH.

So here is my accountability, in 2015 I am going to focus on finishing the projects that I have started over the past few years. That's not to say I won't start some new ones and leave them unfinished. ;)


Pin It

Monday, October 8, 2012

Make It Monday: Liquid Hand Soap

This is another DIY project that's been on my list of things to try - liquid hand soap. This particular method starts with a bar soap. You grate it, melt it down, and have soap. It's very similar to homemade liquid laundry detergent.

Jake was very excited when I said we were going to make soap. He asked if he could do everything by himself.

And everything he did.


Start by grating a bar of soap into flakes.

I hand-grated my soap for laundry detergent for years because I didn't want to possibly hurt my precious food processor. It's a pain and it takes forever. One day though, I took a chance. Let me tell ya, no more hand-grating for me! It works quickly and efficiently. My food processor is truly one of my favorite gadgets in the kitchen.

Besides, hand-grating never produced that pure-joy smile!


I tried telling them that this wasn't supposed to be fun - it's work!

They just wouldn't believe me though.


Pour 10 cups of water into a large pot.

We used purified water instead of the chemically tap stuff, but I'm not sure you have to. Well you don't have to have to. You can really do whatever you want, but you know.


Add 1 tablespoon glycerin.

We had a bottle in the closet from making bubbles. Yea!


Add 1 cup of the soap flakes.


Heat on medium-low, stirring occasionally, until the soap dissolves.

Let it cool completely (some have had best results with letting it cool overnight.)


While you're waiting, definitely take time to play . . . um, I mean . . . test. Yes, take time to test your soap. 

I may have been the first one to plunge my hand into the cool, goopy, slimy substance. And I may have enjoyed it a little too much. And I possibly called the kids over to test it, as well. And they definitely loved the sensory experience. It reminded me of this messy science experiment and this even messier science experiment.

At least this time, the messy science experiment was actually cleansing in and of itself!   


When you're soap is thoroughly cooled - and you're done playing - pour it into bottles using a funnel. Squirt and wash.


So, what do I think?

  • First of all, it's extremely easy to make. My 6 year old made completely it by himself.
  • Second, it's very cheap. And I like cheap.
  • Third, I don't know. It's watery and suds very little. Not that you need the sudsing, but it's a mental thing. I also filled the kids' foaming soap dispenser, and it works great in there.
  • Fourth, it smells great, but that's determined by the bar soap you use. We used Jergens.

I'm semi-pleased with this soap. When we run out, I plan to experiment a bit more. There are many helpful comments that might help me produce a better soap. The important thing is that it is indeed cleaning our hands.


Have you ever tried making liquid soap? How did it turn out?

Pin It

Sunday, September 30, 2012

D is for DIY

I'm blogging through the alphabet again. Or still. Or something. Did you know that if you miss a week, everyone else just keeps going. Can you believe it? I thought about removing the letters B and C from my alphabet and explain that that's the reason why I missed blogging about those two, but somehow I'd have a hard time even writing that. I mean, logging through the alphaet?  Things ould e kinda onfusing and it ould e hard to omprehend exatly what was eing said. Do you onur?

Maybe I should just admit that good intentions don't write posts. People write posts. And that brings us to the letter D.

D is for Do It Yourself. We are big DIYers here. Not only does doing things yourself save so much money, but it's fun too. Both Leighton and I enjoy DIY projects. Our lists are very different though. 

I love homemaking. I make most of our food from scratch (including sauces, breads, desserts, canning, etc.) I make my own baby wipes. I make my own laundry detergent. (I need to post the recipe I've been using. It's even better on stains than my previous homemade detergent.) I make my own household cleaners. I do the schooling. The next two things on my list that I really want to make myself are sunscreen and deodorant. You can check out more of my future projects on my DIY board on Pinterest.


My DIY things are more every day things that save us money on a regular basis, whereas Leighton's projects are more once-in-a-while things that save us tons of money at a time. I said that I love homemaking. He loves homekeeping. He takes care of all the repairs around the house (plumbing, washer/dryer, freezer, electrical, oven.) He completes all our cosmetic work (painting, installing cabinets, remodeling.) He crafts all the woodworking (bunk beds, book cases/shelves, doll house, play set.) He performs all our outside work (demoing things in our yard from previous owners, adding concrete, tree removal.) He does all the work on our vehicles (oil changes, all repairs/replacements, tire rotation.) He fixes absolutely anything that is broken. He is my handyman. And he can do it all.


Why pay someone else to do things that you can do yourself? We are DIYers. And we love it.


Head on over to Ben and Me to read about more D words. And now that I'm done, I'd better start on letter E's post. I'd rally hat to rmov it from th alphabt too. It would b vn hardr to rad. S what I man???

Pin It

Monday, February 6, 2012

Felt Board Snowman

I mentioned a couple weeks ago about a very special project we were working on. Well, here it is . . . a felt board customizable snowman!

All three kids love playing with our felt board sets. We have upper & lowercase letters, numbers, pirates, princess/castle, and firefighters. I like that it keeps them playing quietly while enhancing their imaginations.

Mostly I like that it keeps them quiet.

I thought it would be fun to make a set myself instead of buying another one. With it being winter, a snowman seemed like a logical choice. And since we've had no snow this winter, this gave them the opportunity to build a snowman despite the uncooperative weather.

I've said many times, I am not the artistic one of the family, but I gave it a try. I used a compass to make 3 circles for the body of the snowman on plain printer paper. Then, I used those templates as guides for the accessories. Sometimes I drew it how I wanted the first try . . . other times I had to draw, erase, and redraw before getting it how I wanted. Overall, I didn't do too shabby. Jake and Alyssa had fun giving me ideas of what to add.


Once the accessories were drawn, I cut them out and used a fine-tipped black marker to trace them onto the felt. Then I cut the shapes out of the felt.

FYI, it's hard to see black marker on black felt, in case you were wondering.


Some of the pieces needed to be glued together. I used regular school glue, but a glue gun might work better. 


And here is the finished (for now) set! I keep coming up with more ideas of pieces to add. I'm trying to recruit Leighton into helping me with some of the harder things. He hasn't been nearly as enthusiastic about creating this as I have been. Party pooper.


The kids love it though. We've had so much fun creating and recreating snowmen.


Here are a few of the ones we've made. Aren't they cute?


Oh, but the real fun comes when you start combining other felt sets.

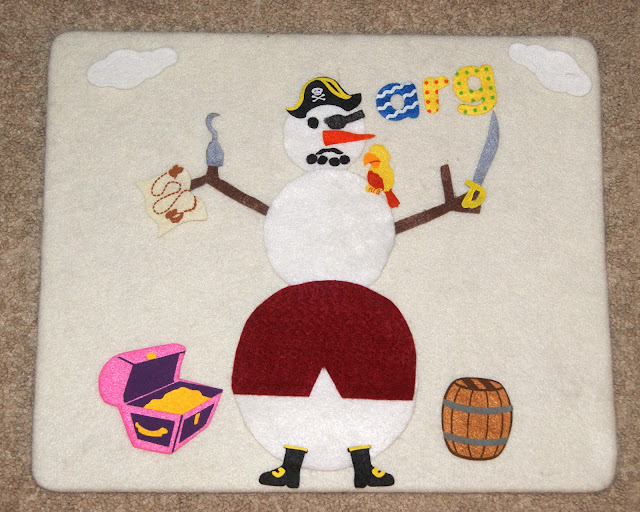
 Arg! It be pirate snowman! He found me buried treasure in the snow.


Hurry, firefighters! Help the poor melting snowman before all that's left of him is a big puddle!


I admit, those last 2 scenes I made while the kids were in bed. I was playing with the felt and having entirely too much fun . . . by myself. I may even have been a little slap-happy. I was laughing so hard at my own creations that I had tears rolling down my cheeks. Leighton just rolled his eyes. Again I say, party pooper. He asked, "Who did you make that for?" Uh, the kids . . . I think.


I will definitely be adding to my new felt obsession, I mean, our felt collection over time. It really was a lot of fun to make and even more fun to play with! Even if you're not overly artistic (or not artistic at all, like me) try making a set yourself and see how easy and fun it is!

Just make sure you let the kids play sometimes, too.


* If you don't have your own felt board and don't want to spend the money on a pre-made one, you can easily staple or hot glue a large piece of felt to a panel of cardboard (cereal box, shipping box, etc) and have your very own board in minutes.


Linked to T.G.I.F Linky Party and the Sunday Showcase
Pin It

Tuesday, December 7, 2010

Make It Monday: Baby Wipes

This week was double the fun for Make It Monday. We made Christmas ornaments as seen in the previous post. We also desperately needed baby wipes. I stock up on all essentials whenever I can get the best price. Unfortunately, I haven't been able to get any good deals on baby wipes or diapers recently. I was very happy months ago when I got 4 tubs for free after a sale and coupons! As any parent knows though, wipes don't last long, especially when you have a baby as well as a 2-year-old who is obsessed with them. I think we've finally broken her of the habit, but Alyssa loved getting wipes to clean her face or shoes or toys or face or mirrors or face . . . you get the idea. Running to the store and paying full price just because we needed them did not sound like a good plan to me. I'd thought about making them in the past. Why not? We've always made baby food as seen here and laundry detergent as seen here. This project was perfect for me.

You will need 2 cups water, 2 tbsp olive (or baby) oil, 2 tbsp baby soap, 1 roll paper towels.


Boil water and let cool to room temperature.

Add the oil and soap to the water.

Cut the paper towels in half using a serrated knife. Remove the cardboard tube.

Add the mixture and the towels to an airtight container. Close the lid and turn upside down for 10 minutes.

Pull your wipes from the center of the roll.

It was very easy to make the baby wipes. I think the hardest part was trying to get the cardboard tube out of the paper towels, until I realized that I could just squish the tube and pull it right out. Go figure. For some reason, I was trying to keep the roll intact. Also, I found that these wipes don't pull out as easily as the store-bought ones. I'm hoping that it gets better as the roll gets smaller. They work great so far, but are a little wetter than I'd like. They smell good and are gentle on Zachy's little bottom. I'm not sure yet if I would completely replace store-bought wipes with homemade, but it was fun making them. The best part? Not having to pack the kids up, run to the store, and pay full price for something I could easily make at home. That makes me a happy mommy.


* Update*
I have made these wipes consistently since this post. I dropped the water back to 1 3/4 cups which makes them the proper wetness. I stopped boiling the water and just use purified. I've tried them with baby oil, but prefer the olive because the baby oil leaves the skin too greasy. Also, I used different baby washes/shampoos, but definitely prefer the milder, less scented ones. I don't usually pull the wipes through the top, but instead open the container and pull from there. Sometimes it's easier to grab a wipe from the end of the roll instead of the middle. And most importantly, always use quality paper towels! Trust me, I've tried many different brands. The cheaper ones fall apart and tear, requiring you to use more, and thus defeating the purpose of saving money. With these changes, I'm very pleased with how they work and love making my own wipes!

Pin It